You may find that you need to delete a TICK from your inventory. Perhaps you’re upgrading your item’s tracker to a ONE-KEY™ Bluetooth® Tracking Tag. Or you might have recently upgraded to One-Key compatible smart tools across your fleet and don’t need a Bluetooth tracker in your inventory anymore. Or maybe you’re cleaning up your inventory and removing retired items whose statuses have previously been updated. Whatever the reason, once you physically remove an out-of-service TICK from the item you’ve attached it to, you should also remember to delete it from your inventory; otherwise, it may remain in your inventory, unused.
You’ll learn in this article how to do just this.
You can select any of the below bulleted items to be taken to the corresponding section of this article where we discuss each of them:
- Learn how to delete a TICK on Android
- Learn how to delete a TICK on iOS
- Learn how to order a Bluetooth® Tracking Tag or Asset ID Tag on web
Get Started on Android, iOS, or Web
- Launch the app on your respective platform.
- Inventory will load by default, where you can search for your TICK either by scrolling through your inventory list to find the item it’s attached to, or by searching the item by keyword.
How to Delete a TICK on Android
Note: The screens featured in this article may appear different than what you see on your device due to different phone manufacturers having different procedures.
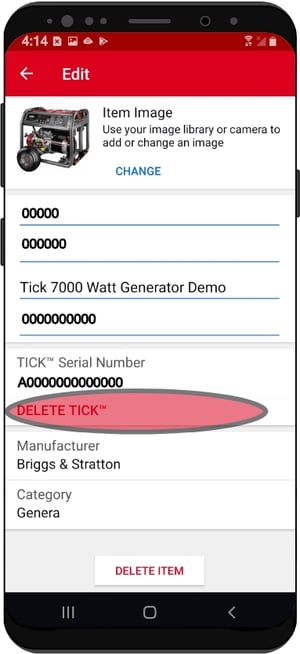
- Once you’ve launched One-Key on your Android device and found your item, tap into its details.
- On your item’s detail screen, select the blue pencil edit icon located beside your item’s photo and model info/description.
- This will bring you to the Edit screen for this particular item. Near the center of the screen, you’ll see a “Delete TICK™” button. Tap this button to delete your TICK from this item.
-
- NOTE: While you can also select “Delete Item” if you’re also deleting this item from your inventory, we recommend first deleting your TICK, then deleting your item. Why? While deleting your item first in some cases may also delete the TICK automatically, in some cases the TICK may end up unassigned in your inventory and you’ll need to delete it separately. To avoid this, we recommend deleting your TICK first, then deleting the item.
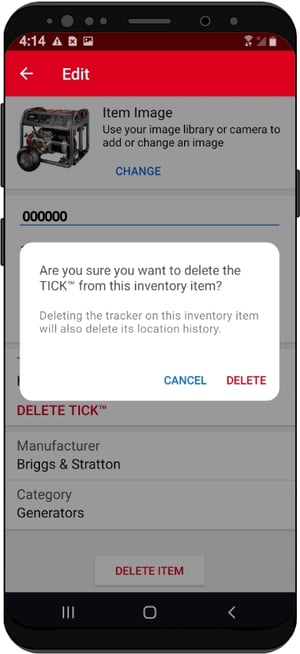
- Once you’ve tapped the “Delete TICK™” button, you’ll be displayed a warning screen, asking if you’re sure you want to delete your TICK from inventory. Tap “Delete” to continue.
Your TICK has been deleted. Now that you’ve deleted your TICK, you can proceed with deleting your item, or you can follow our instructions to learn how to add a Bluetooth Tracking Tag, or how to add an asset ID tag to your item.
How to Delete a TICK on iOS
- Once you’ve launched One-Key on your iOS device and found your item, tap into its details.
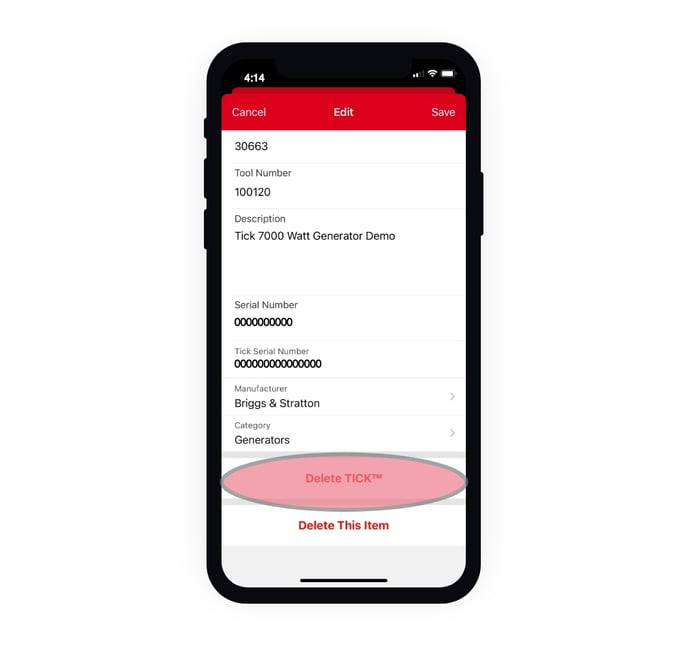
- On your item’s detail screen, select the gray carrot edit icon located beside your item’s photo and model info/description.
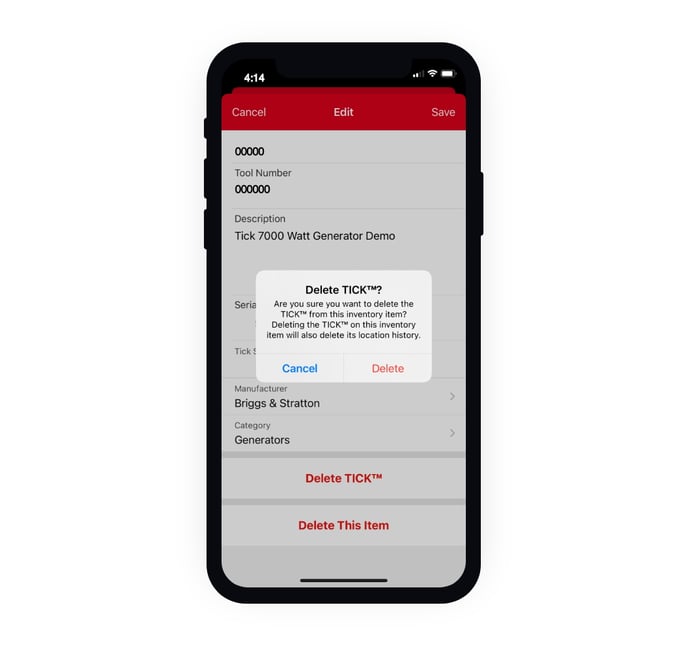
- This will bring you to the Edit screen for this particular item. Near the bottom of the screen, you’ll see a “Delete TICK™” button. Tap this button to delete your TICK from this item.
-
- NOTE: While you can also select “Delete Item” if you’re also deleting this item from your inventory, we recommend first deleting your TICK, then deleting your item. Why? While deleting your item first in some cases may also delete the TICK automatically, in some cases the TICK may end up unassigned in your inventory and you’ll need to delete it separately. To avoid this, we recommend deleting your TICK first, then deleting the item.
- Once you’ve tapped the “Delete TICK™” button, you’ll be displayed a warning screen, asking if you’re sure you want to delete your TICK from inventory. Tap “Delete” to continue.
Your TICK has been deleted. Now that you’ve deleted your TICK, you can proceed with deleting your item, or you can follow our instructions to learn how to add a Bluetooth Tracking Tag, or how to add an asset ID tag to your item.
How to Order a Bluetooth® Tracking Tag or Asset ID Tag on Web
Now that you’ve deleted your TICK via the mobile app, you may find you want to order a Bluetooth Tracking Tag or Asset ID tag via the One-Key web app, especially if you’re working from the back office or tool crib. Let’s show you how.
- From your inventory, find the item you’d like to add a Bluetooth Tracking Tag or Asset ID tag to and tap into its details.
- Along the right side of the screen, you’ll see your item’s location and tracking information. Select “Order a new Tracker.”
- You’ll be displayed a menu of tracking products you can choose from. If you wish to order an Asset ID tag, for example, you’ll be able to choose by application/material and size: Small Plastic, Small Metal, Large Plastic, or Large Plastic. To order asset ID tags, click on one of these options and you’ll be redirected to the corresponding product page.
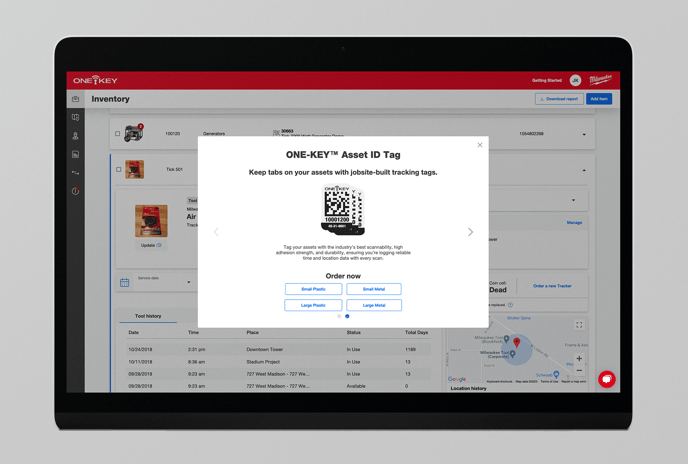
- Tap the gray carrot beside Asset ID tags and you’ll be displayed the Bluetooth Tracking Tag menu options. Here, you can select by quantity (single, 2-pack, or 10-pack), and you’ll be redirected to the corresponding product page.
![]()
You now know where in the One-Key web app to navigate to when you want to order new trackers for an item.
Deleting a TICK may be necessary. You now know how to delete a TICK via Android or iOS, as well as how to order new tracking products via the One-Key web app.