One-Key compatible tools need to be added to inventory in order for you to take full advantage of their built-in technology, security, and tracking functionality.
This article will explain how to:
-
Add a One-Key compatible tool, or multiple tools to your inventory all at once.
-
Add the tool’s other important specs.
You can select any of the below bulleted items to be taken to the corresponding section of this article where we discuss each of them:
- Learn how to add a One-Key compatible tool and relevant specs on Android
- Learn how to add a One-Key compatible tool and relevant specs on iOS
Get started on the One-Key mobile app
-
Make sure the One-Key tool you wish to add is nearby.
-
Make sure Bluetooth is activated on your mobile phone.
-
Login to the One-Key mobile app.
-
The homepage, or Inventory Dashboard, will display on your screen.
How to add a One-Key compatible tool on Android
Note: The screens featured in this article may appear different than what you see on your device due to different phone manufacturers having different procedures.
-
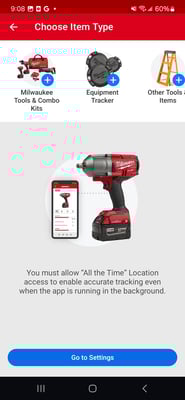
To get started, make sure you have your Bluetooth® enabled for the app, as you’ll need this in order to connect to your new tool.
-
Starting from the Inventory Dashboard, tap the “+” sign in the upper right hand corner of the screen. Make sure the One-Key compatible tool you wish to add is nearby and that Bluetooth is activated on your mobile phone
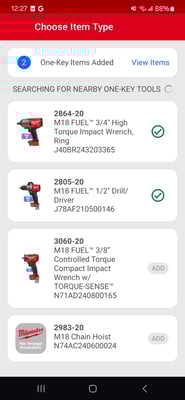
- Nearby devices will populate your screen.
-
Add one item, or you can add many items, all at once for added convenience. After you tap the “Add” button beside each item, a green check mark will appear, indicating the item has successfully been added to your inventory. At the top of the screen, as these items are added in, you’ll notice the number of items grow.
-
Once your items are added, you can choose to view your item's general info, or its unique item info.


How to add your tool’s other important specs
Before you finish, make sure you take a second to manually enter in the other important details about your tool:
- adding custom tool numbers
- adding category for easier sorting
- assigning tool to a specific place, person, and division to describe the work this tool will be used for, and for added accountability. Tap again to connect to this tool and to access its details page. Here, you can add additional information, such as:
- changing the tool’s status to better reflect its current condition or availability
- adding a service date and set a reminder to stay on top of your tool’s maintenance
- adding purchase information (such as where your bought it and for how much, and attach a receipt) for easier bookkeeping
- Make sure to tap the Save button to log all of this new information to One-Key.

Your One-Key compatible tool has been added.
How to add a One-Key compatible tool on iOS
A One-Key compatible tool has to be synced with the mobile app before you can take advantage of its inherent tracking capability.
-
Starting from the Inventory Dashboard, tap the “+” sign in the upper right hand corner of the screen. Make sure the One-Key compatible tool you wish to add is nearby and that Bluetooth is activated on your mobile phone
-
A menu of different kinds of items to add to your inventory will appear at the top of your screen, while your nearby ONE-KEY compatible tools and equipment will populate in the screen below this menu.
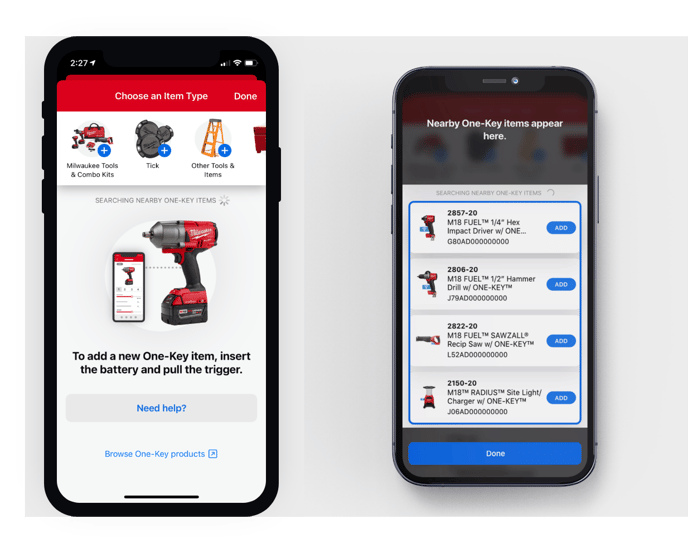 You’ll see, beside each of these items, a blue “Add” button:
- You can tap “Add” for any and all of the ONE-KEY compatible tools you’d like to add.
- Add one item, or you add many items, all at once, for added convenience. After you tap the “Add” button beside each item, a green check mark will emerge, indicating the item has successfully been added to your inventory. At the top of the screen, as these items are added in, you’ll notice the number of items grow.
When you’ve finished adding items, you can tap “View items” to add more details to your items. Once here, you’ll see all of the items you’ve just added. You’ll notice that the item’s photo, description, model number, and serial number will be auto-populated for you.
How to add your tool’s other important specs
Before you finish, make sure you take a second to manually enter in the other important details about your tool:
-
Category: Type of tool.
-
Person: Crew member your tool is assigned to.
-
Division: Team your tool is assigned to.
-
Place: Place your tool is assigned to.
-
Tool Number: Custom name/number you’ve given your tool.
-
Serial #: Serial number of this specific tool.
-
Status: Availability or physical condition of your tool.
-
Purchase Information: Value of your tool, date/place of its purchase.
-
Service Date: Add a service date for routine maintenance/repair reminders.
-
Assign barcode: Enter a trackable barcode number or asset ID tag.
-
Add Nearby TICK™: Add an external TICK Bluetooth tracker or equipment tracker or Bluetooth Tracking Tag.
You can repeat this process for entering information for all of the items you’re adding all at once. Once you’ve filled your item’s details to your liking, tap “Done” in the upper righthand corner to save your item to your inventory. Your items will be added to inventory and be ready to send to the job.
Now that you've added your new item, you can customize, track, and manage it in the One-Key app, backed by industry's largest Bluetooth tool tracking network and a comprehensive, enterprise inventory management system.