At Milwaukee Tool, we build advanced Bluetooth® tool tracking functionality into our compatible smart tools, enabling you to assign tools to geofences at jobsites, lock them out remotely, and more. One-Key compatible tools contain an internal coin cell battery that will periodically need to be changed. But what does this coin cell battery even do? And why, and how, do you need to replace it?
In this article, we’ll cover what you need to know about coin cell batteries in One-Key compatible power tools.
You can select any of the below bulleted items to be taken to the corresponding section of this article where we discuss each of them:
- Learn what a coin cell battery does
- Learn where and how to replace your coin cell battery on your One-Key compatible power tools
1. Context: What Is a Coin Cell Battery in a One-Key Compatible Smart Tool For?
When you’re in the details page of a One-Key compatible tool, you’ll be able to see its coin cell battery health displayed as 1 of 5 statuses—“Great, “Good,” “Fair,” “Poor,” and “Dead”—and you may see an alert that your tool’s coin cell battery is running low and needs to be replaced soon.
You might be wondering what these battery health messages mean, considering that it’s your M12™, M18™, or MX FUEL™ battery pack that powers your tool’s internal motor. Assuming that you’ve added your One-Key compatible tool to inventory and enabled tool tracking, you can track and manage it even if it’s not hooked up to a fully charged battery. In instances where tools start to wander outside—whether in error or in the hands of bad actors—being able to maintain visibility to your tool’s whereabouts and location history is critical.
While your battery pack is what powers the motor in your tool and makes it functional to perform a task, the coin cell battery embedded in One-Key compatible tools serves as a backup power source that enables critical tool tracking functionality. Coin cell batteries, which consume relatively low power, enable them to run in the background—and when the tool’s battery pack has been removed or died, the coin cell battery enables that tool to be seen by our network and update its location.
Should you encounter a wayward tool, you’re able to mark it missing or stolen, or proactively lock it out remotely.
Now that you know what the coin cell battery in your One-Key compatible does, it’s critical to change them out prior to them dying on you. The One-Key app provides coin cell battery health statuses so that you know to proactively replace them. If you see the status of your tool’s coin cell battery move from “fair” to “poor,” for example, it’s crucial to prioritize replacing it as soon as possible and prior to it registering “dead” to ensure your ability to track your tool is not disrupted.
Note: If you send your tool to one of our service teams to address a coin cell battery replacement, it may be sent back unless the coin cell battery is completely dead. Replacing your tool’s coin cell battery yourself, however, is pretty straightforward, and we’ll discuss that process below.
2. How to Find and Replace Your Coin Cell Battery on Most One-Key Compatible Tools
You now know what the coin cell battery in your One-Key compatible tool does, and why it’s important to replace it in a timely manner. Now, we’ll show you how to replace it.
To do so, you’ll first need locate where the coin cell battery module is on your tool.
Where can you find the coin cell battery on a One-Key compatible tool?
The coin cell battery on a One-Key compatible tool is typically embedded within the battery bay section the tool. This low-surface area ensures the battery module can be inserted where it doesn’t interfere with the tool’s motor, while also being securely kept in place and safe from the damages inflicted by external forces.
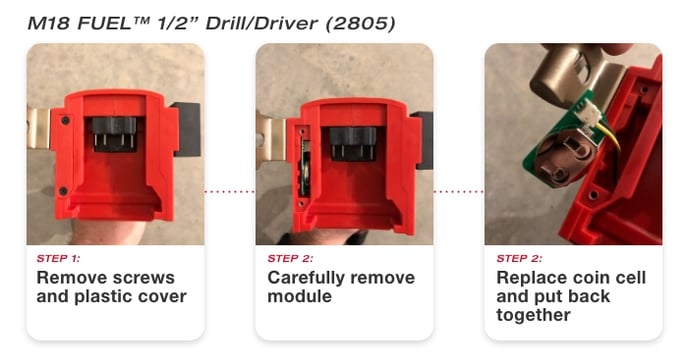
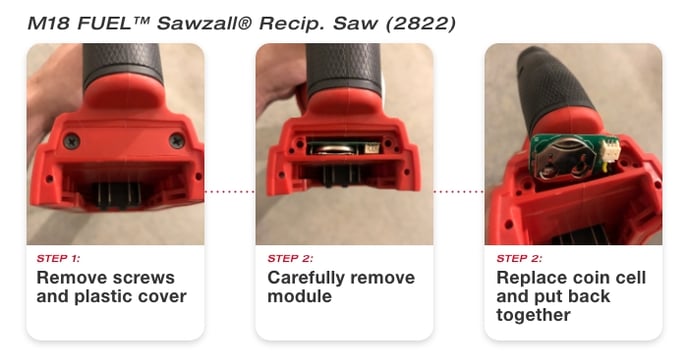
To remove and replace your tool’s coin cell battery:
- Find the battery bay on your One-Key compatible tool and locate the coin cell battery module, beneath a fine strip of plastic punctuated by two black Philips’ head screws.
- Using a Philips’ head screwdriver, carefully unscrew each of the screws keeping your tool’s coin cell battery module securely in place.
- Once removed, place these two small screws in a safe place, then carefully pull this plastic strip out of your tool. You may find tweezers helpful in grasping onto this plastic strip.
- Like the screws, place this plastic strip in a safe place. You’ll see within this hidden recess a green computer chip with an embedded coin cell battery. Carefully pull this module out of your tool. You may find tweezers helpful in grasping onto and freeing this battery module from its compartment, but proceed with caution to prevent damage to the battery module. Be careful not to damage the wire attached to the battery module, which connects it to the tool and enables it to function.
- Once the battery module has been carefully pulled from its compartment, locate and pull the circular coin cell battery from its metal housing, and replenish it with your new coin cell battery.
- Reinsert the coin cell battery module with its fresh coin cell battery into its compartment, then reinsert the plastic strip that covers it up, and screw this plastic strip back into place.
You now know what the coin cell battery in your One-Key compatible tool does, why it’s critical to replace it in a timely manner, and how to replace it.