Tool location history data can be used to illustrate how your equipment is being used in the field, while also helping you make data-driven decisions about continued use. It will likewise come in handy when coordinating with authorities should an item get stolen.
In this article, we’ll show you how to access your item’s tool location history on Android, iOS, and Web.
You can select any of the below bulleted items to be taken to the corresponding section of this article where we discuss each of them:
- Learn how to access tool location history on Android
- Learn how to access tool location history on iOS
- Learn how to access tool location history on Web
Get Started by Launching the App on Android, iOS, or Web
- Launch the One-Key app on your mobile device or in your web browser.
- Your inventory will load by default.
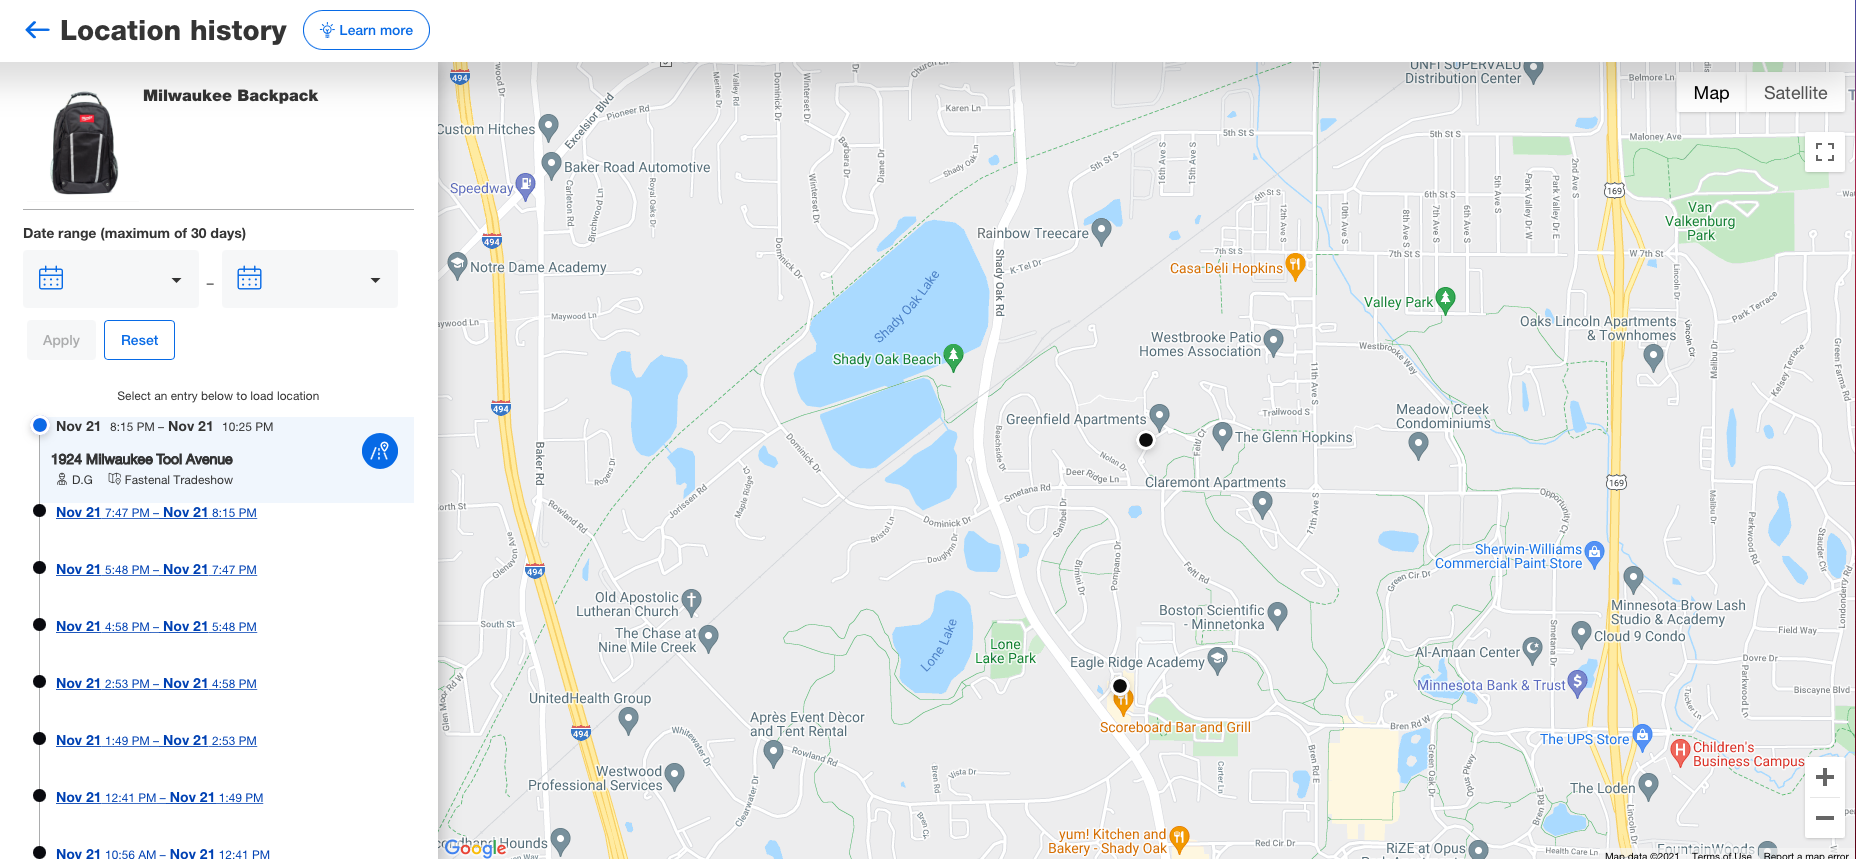
How to Access Tool Location History on Android
Note: The screens featured in this article may appear different than what you see on your device due to different phone manufacturers having different procedures.
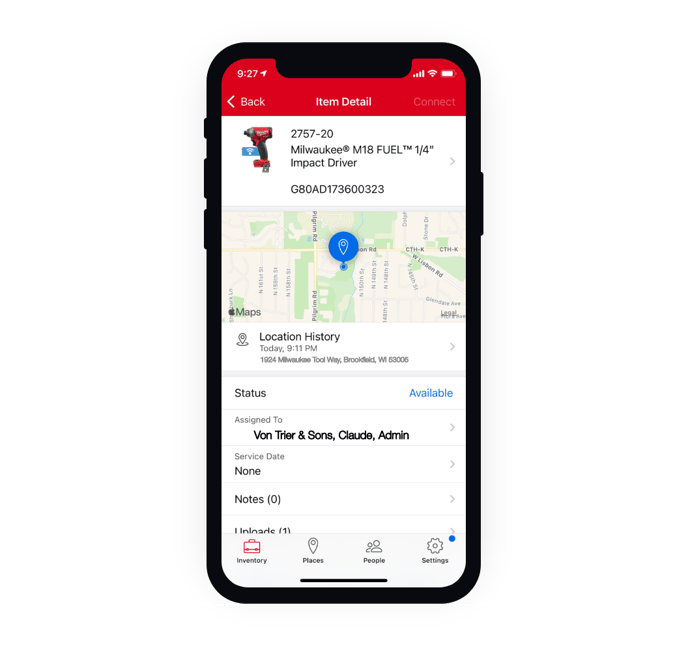
- Pick an item you want to inspect. Your item’s most recent location, pinned on a map, will appear in its details page.
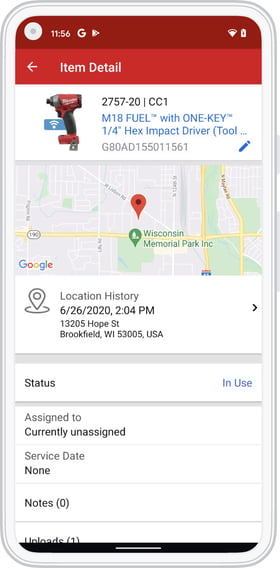
- Tap Location History, under the map.
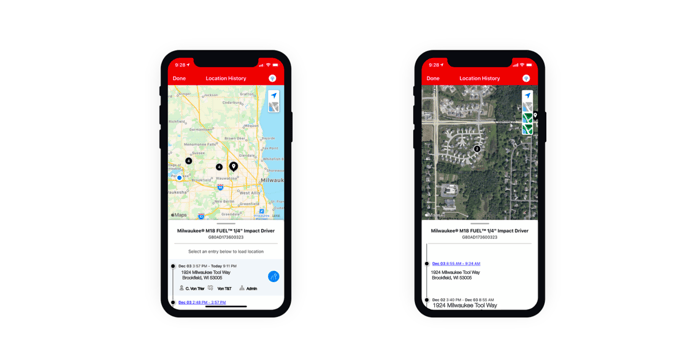
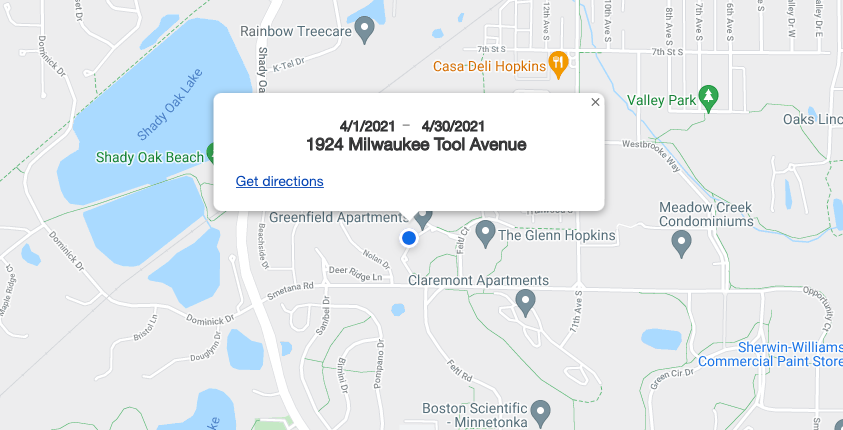
- When you tap into your item’s location history, a map will open with its most recent location displaying.
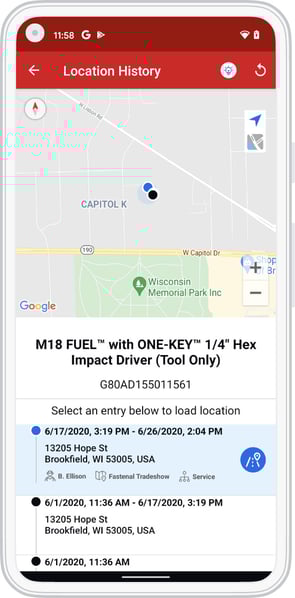
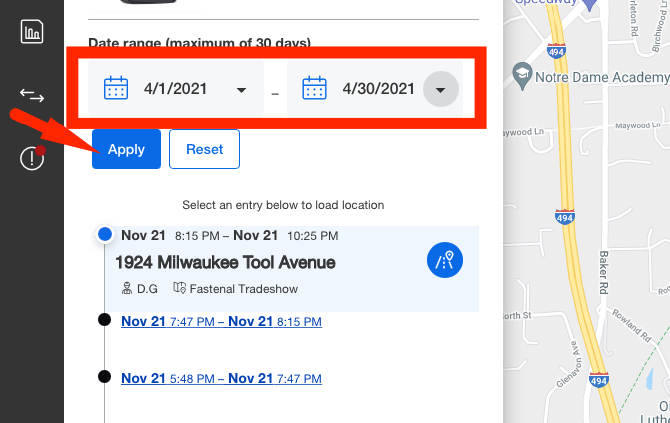
- Beneath the map, in addition to your item’s most recent location, you’ll now see a timeline with locations where your tool has been during the last 30 days from last seen.
- Your item’s most recent location will still open by default, displaying the address it was seen and time it was seen, as well as whom it’s assigned to and company information if you’ve added these into One-Key.
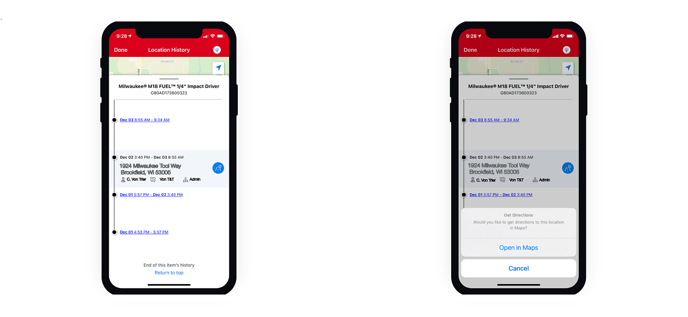
- Beneath the most recent location, you’ll also see a timeline with additional locations where your tool has been during the last 30 days from last seen. We’ll likewise indicate in red on this timeline the dates on which an item was marked missing or stolen. Each of these can be tapped into to get more location history data.
- When you tap on one of these locations, a pin on the map above will appear, visualizing and contextualizing its precise setting to you. You can pinch to zoom in or out and see nearby street locations. If it’s an unfamiliar area, you can also elect for the map to display satellite images. To do this, tap the map icon, located just beneath the blue navigation icon at the top righthand corner of your screen. When it expands, two green maps will drop down. Tap the first one to change the default map that displays to satellite images and contextualize the surrounding area with notable landmarks. Tap the second green map to populate the map with nearby road names.
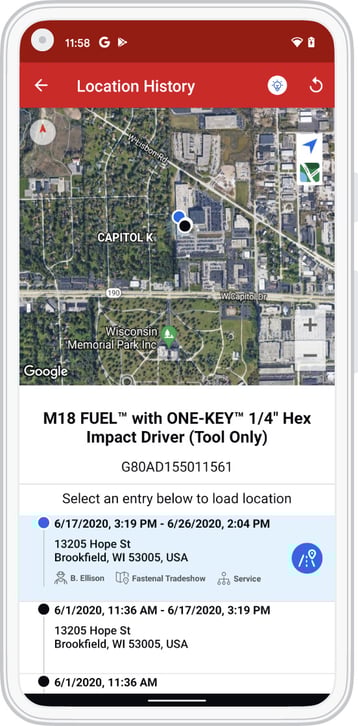
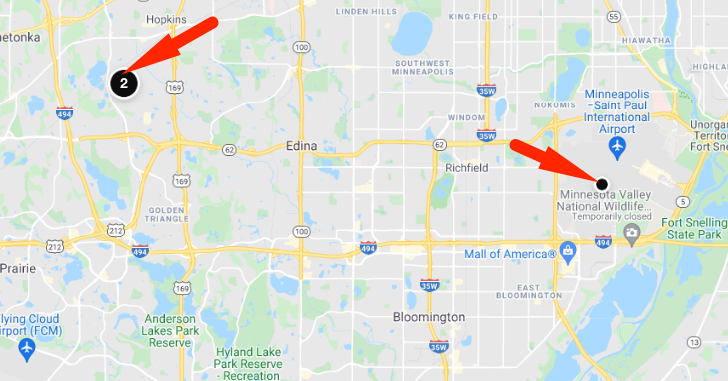
- You can also zoom out further to place this location into greater geographical context beside adjacent towns and cities. When you zoom out further, groupings of locations will appear on the map. While individual pins represent a single location, numerals indicate how many locations are represented in a specific area. Depending on how far zoomed out you are, if you tap on one of these numerals, the map will zoom in for you, displaying smaller groupings spread out on the map or individually pinned locations that you can tap into and inspected.
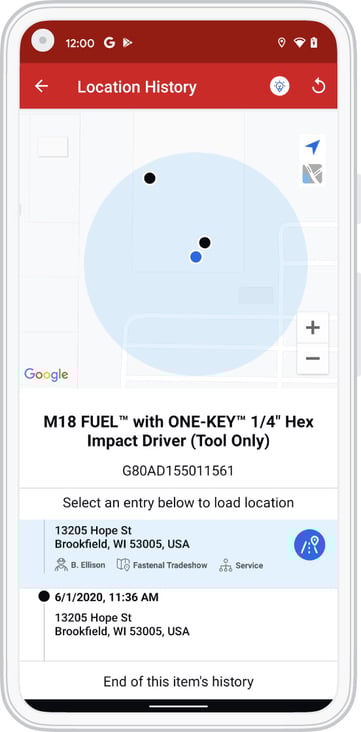
- Once you’ve found a location you want to inspect and have expanded it, you can also tap on the blue directional icon beside this location, which will prompt you to open your device’s native maps application so you can get directions to this location if you’d like.
How to Access Tool Location History on iOS
- Pick an item you want to inspect. Your item’s most recent location, pinned on a map, will appear in its details page.
- Tap Location History, under the map.
- When you tap into your item’s location history, a map will open with its most recent location displaying.
- Beneath the map, in addition to your item’s most recent location, you’ll now see a timeline with locations where your tool has been during the last 30 days from last seen.
- Your item’s most recent location will still open by default, displaying the address it was seen and time it was seen, as well as whom it’s assigned to and company information if you’ve added these into One-Key.
- Beneath the most recent location, you’ll also see a timeline with additional locations where your tool has been during the last 30 days from last seen. We’ll likewise indicate in red on this timeline the dates on which an item was marked missing or stolen. Each of these can be tapped into to get more location history data.
- When you tap on one of these locations, a pin on the map above will appear, visualizing and contextualizing its precise setting to you. You can pinch to zoom in or out and see nearby street locations. If it’s an unfamiliar area, you can also elect for the map to display satellite images. To do this, tap the map icon, located just beneath the blue navigation icon at the top righthand corner of your screen. When it expands, two green maps will drop down. Tap the first one to change the default map that displays to satellite images and contextualize the surrounding area with notable landmarks. Tap the second green map to populate the map with nearby road names.
- You can also zoom out further to place this location into greater geographical context beside adjacent towns and cities. When you zoom out further, groupings of locations will appear on the map. While individual pins represent a single location, numerals indicate how many locations are represented in a specific area. Depending on how far zoomed out you are, if you tap on one of these numerals, the map will zoom in for you, displaying smaller groupings spread out on the map or individually pinned locations that you can tap into and inspected.
- Once you’ve found a location you want to inspect and have expanded it, you can also tap on the blue directional icon beside this location, which will prompt you to open your device’s native maps application so you can get directions to this location if you’d like.
- Pick an item you want to inspect and click into it.
- You'll see a map in your item's details.
-
Beside the map, select the hyperlink that says, “Show full history.”
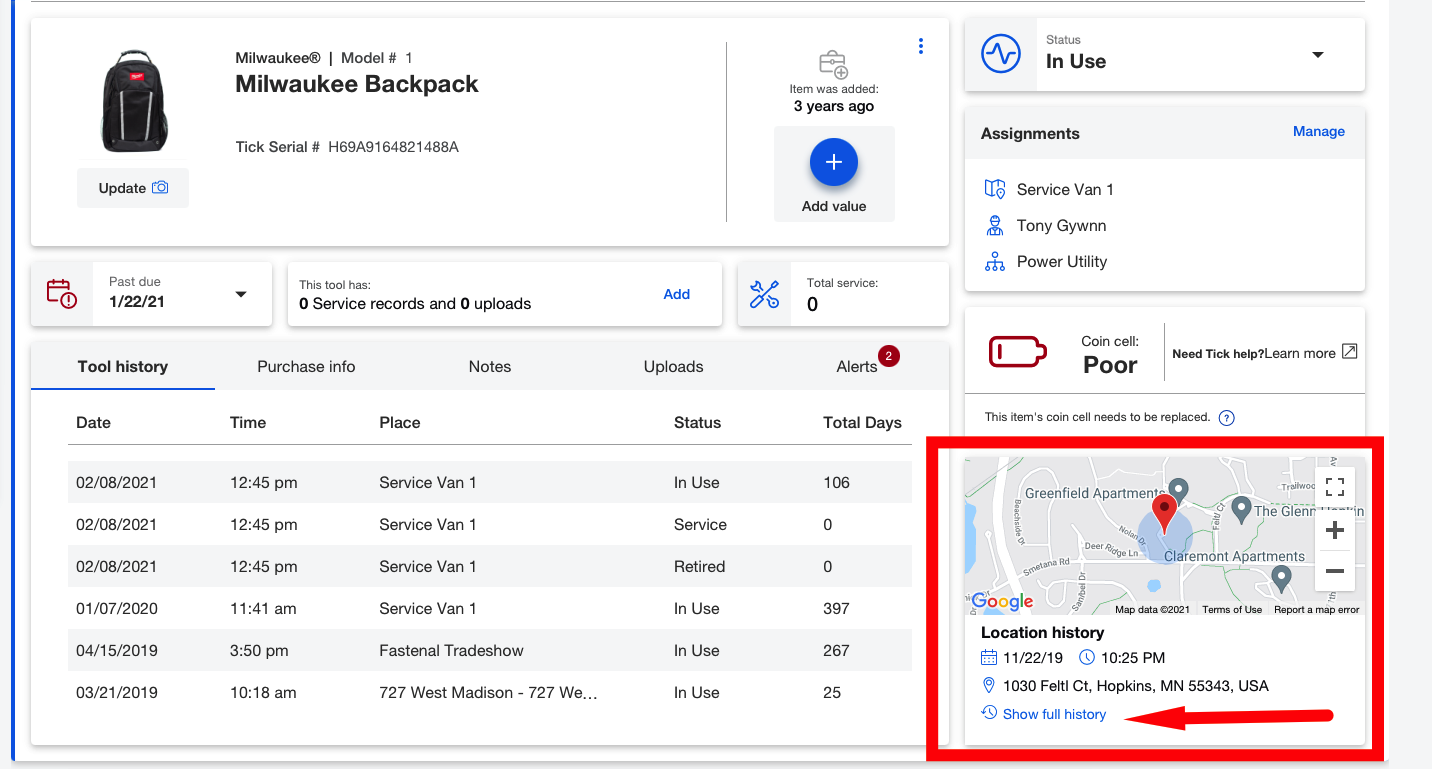
- On the next page, a larger map will display with your item’s most recent location, as well as a timeline with locations where your tool has been during the last 30 days from last seen.
- We’ll likewise indicate in red on this timeline the dates on which an item was marked missing or stolen. Each of these can be selected to get more location history data.
Putting Location History into Context
You can get more contextual information out of the location history feature. Here's how.
- When you select one of these locations, a pin on the map above will appear, visualizing and contextualizing its precise setting to you.
- Use the + and - buttons in the bottom righthand corner of your screen to zoom in and out and show your item's locations on the map next to street names and notable landmarks.
- If it’s an unfamiliar area, you can also elect for the map to display satellite images. To do this, select the “Satellite” toggle button, located in the top righthand corner of your screen, and the map will display notable landmarks. A dropdown option to select or deselect “Labels” contextualizes the surrounding area a step further with nearby road names.
- As you zoom out further, multiple locations in a nearby area will display on the map numerically.
- If you want to narrow your timeline down to a smaller ballpark, you can set a date range to yield item locations within a specific 30-day range.
- Once you’ve narrowed down a specific pin on the map you want more information about, you can also select the blue directional icon beside this location.
-
This will prompt you to open your device’s native maps application so you can get directions to this location if you’d like.
With location history, you have more control over managing your inventory, equipped with a wealth of data that can be used to make actionable improvements, or save your skin should you encounter a tool that’s out of place.