In this article, we cover how to set up your controlled torque tools w/ TORQUE-SENSE™. Important note: These tools feature an onboard machine learning algorithm that needs to be trained. We’ll cover in this article how to begin this training setup to ensure proper setup.
Which Tools Have Controlled Torque?
The following SKUs feature controlled torque and TORQUE-SENSE™:
|
Item # |
Product Name |
|
3060-20 |
M18 FUEL™ 3/8” CONTROLLED TORQUE IMPACT FRICTION RING |
|
3061P-20 |
M18 FUEL™ CONTROLLED TORQUE COMPACT IMPACT WRENCH & 1/2" PIN DETENT |
|
3061-20 |
M18 FUEL™ CONTROLLED TORQUE COMPACT IMPACT WRENCH & 1/2" FRICTION RING |
|
3062P-20 |
M18 FUEL™ CONTROLLED MID-TORQUE IMPACT & 1/2" PIN DETENT |
|
3062-20 |
M18 FUEL™ CONTROLLED MID-TORQUE IMPACT & 1/2" FRICTION RING |
NOTE: These tools will have a similar setup process but will have different output capacities depending on SKU.
Jump Ahead:
You can select any of the below bulleted items to be taken to the corresponding section of this article where we discuss each of them:
- Download the Mobile App and Get Started
- Connecting to Your Tool
- Setting Up Your Tool
- LED Light Code Matrix
Download the Mobile App and Get Started
If you haven’t used ONE-KEY™ before and your controlled torque tool w/ TORQUE-SENSE™ is your first One-Key compatible tool, you’ll need to start by downloading the app and creating a free account. If you already have a One-Key account, you can skip this step and get started by connecting to your tool.
You’ll want to download the app on your mobile device because you’ll need access to Bluetooth® in order to connect to your tool.
- You can download the app from Apple’s App Store or Google Play depending on if you’re using iOS or Android. If you’re on an iPad, you can also download an iPad OS version of the app from the App Store.
- Once you’ve downloaded the proper version of the app for your device version, you’ll launch the app on your device.
- Once the app has loaded on your mobile device, a blue “Get Started” button will appear.
- Tap the “Get Started” button and login screen will appear by default.
-
- If you already have an account, you’ll type in your email and password and tap “Login” to load your account.
- If you’re new to One-Key, tap the “Sign Up” button at the top righthand corner of your screen to create an account with an email and a password.
Connecting to Your Tool
- Once you’ve logged into your existing or new account, you’ll want to ensure that you’ve enabled Bluetooth so that you’ll be able connect to your tool. To do that:
-
- On Android:
-
-
- In device settings, tap “Connections,” then toggle Bluetooth on.
-
-
- On iOS:
-
-
- In One-Key, tap “Settings” along the bottom menu, then “Tool Tracking.” On the next information screen, tap “Bluetooth.” This will take you to Bluetooth in your device settings for the One-Key app. Toggle “Bluetooth” on.
-
We also recommend enabling Location Services to get the full functionality of Bluetooth Tracking for your tool. To do this, you can read how to enable tool tracking settings in the app. You can also read how a Bluetooth tracking community works.
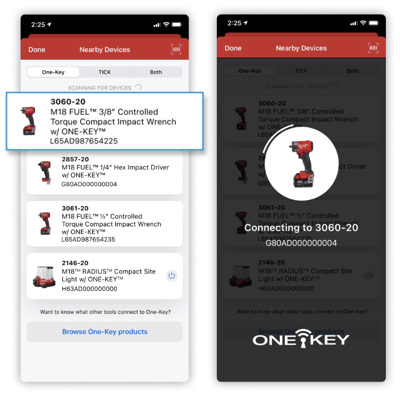
- Once you’ve enabled Bluetooth and logged into your One-Key account, your inventory list will load by default. On this screen, you’ll tap the Nearby Devices button.
- Any nearby Bluetooth-enabled tools will begin to appear on the screen. Ensure you’ve selected “One-Key” among the top button options. Find the precision torque tool w/ TORQUE-SENSE™ you’re looking to setup and tap into it.
Setting Up Your Tool
The app will connect to your tool wirelessly via your Bluetooth connection. This may take a moment.
- Once the app has connected, your tool’s details screen will appear.
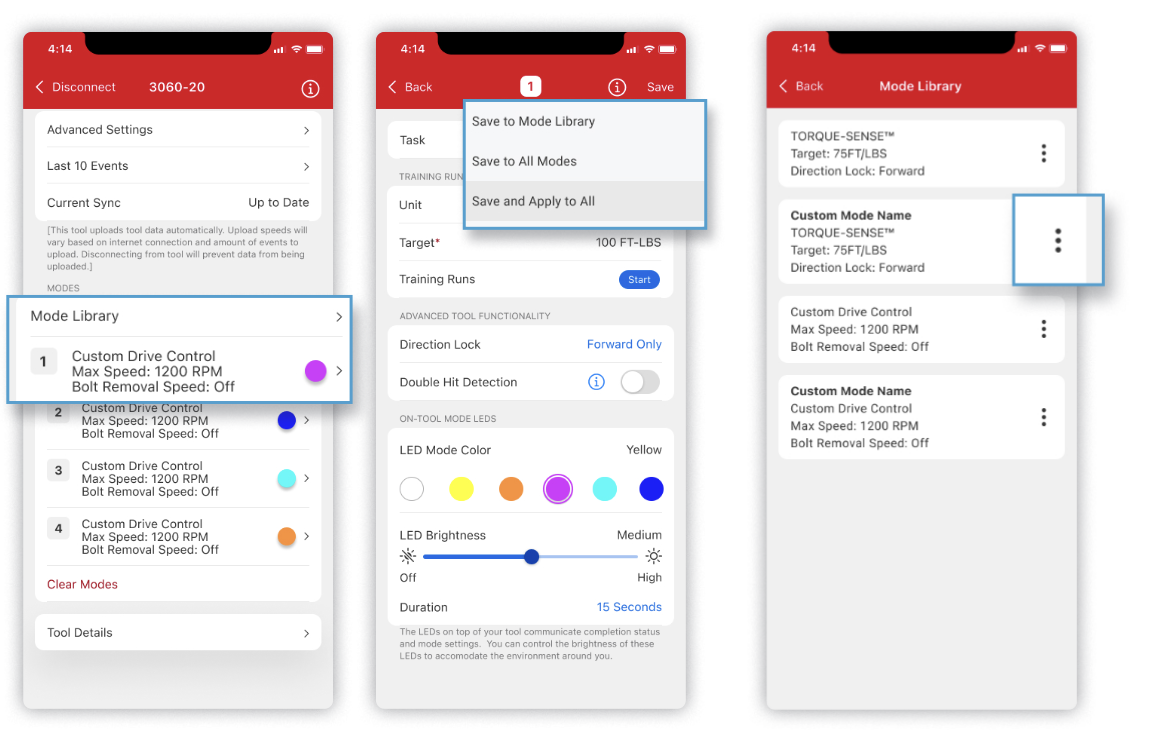
- Four modes will appear that correspond with this tool. These modes can be customized and, if you find that you need to save additional mode customization, you can sync unlimited mode customizations to the cloud via the Mode Library, which can be applied to one of these four modes at any time. If you want to reset your modes to their default settings, tap “Clear Modes.”
- Select one of these modes you’d like to apply TORQUE-SENSE™ to.
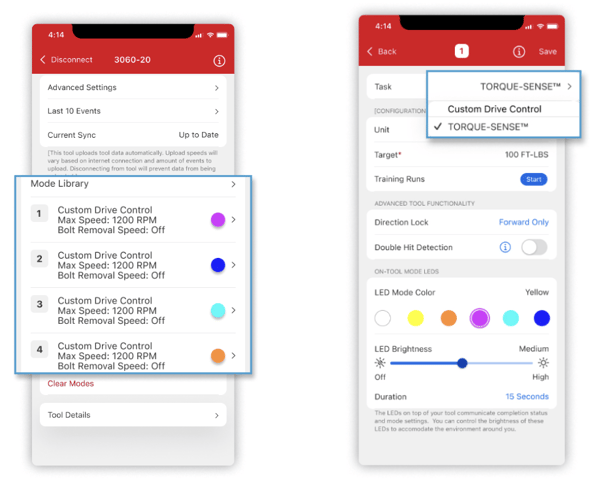
- Tap the “Task” button and select “TORQUE-SENSE™” to change this mode from “Custom Drive Control” to your “TORQUE-SENSE™” mode.
- Select your unit of measurement (e.g., FT-LBS).
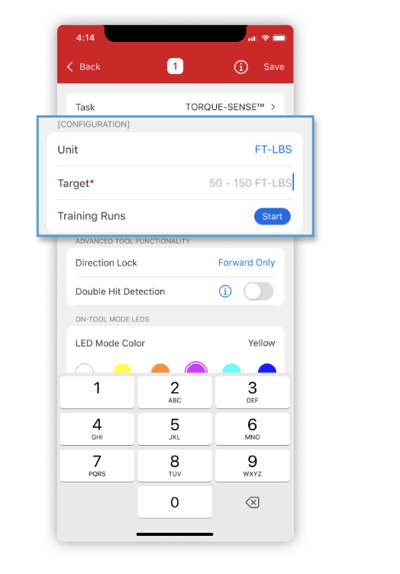
- Now, select the torque target you’d like to train this tool to achieve (e.g., 100 FT-LBS).
- You’ll then tap “Start” beside “Training Runs” to begin training this tool.
- On the next screen, you’ll see a tool status and several training runs. In order to train this tool, you’ll need to perform 10 rundowns to establish a baseline.
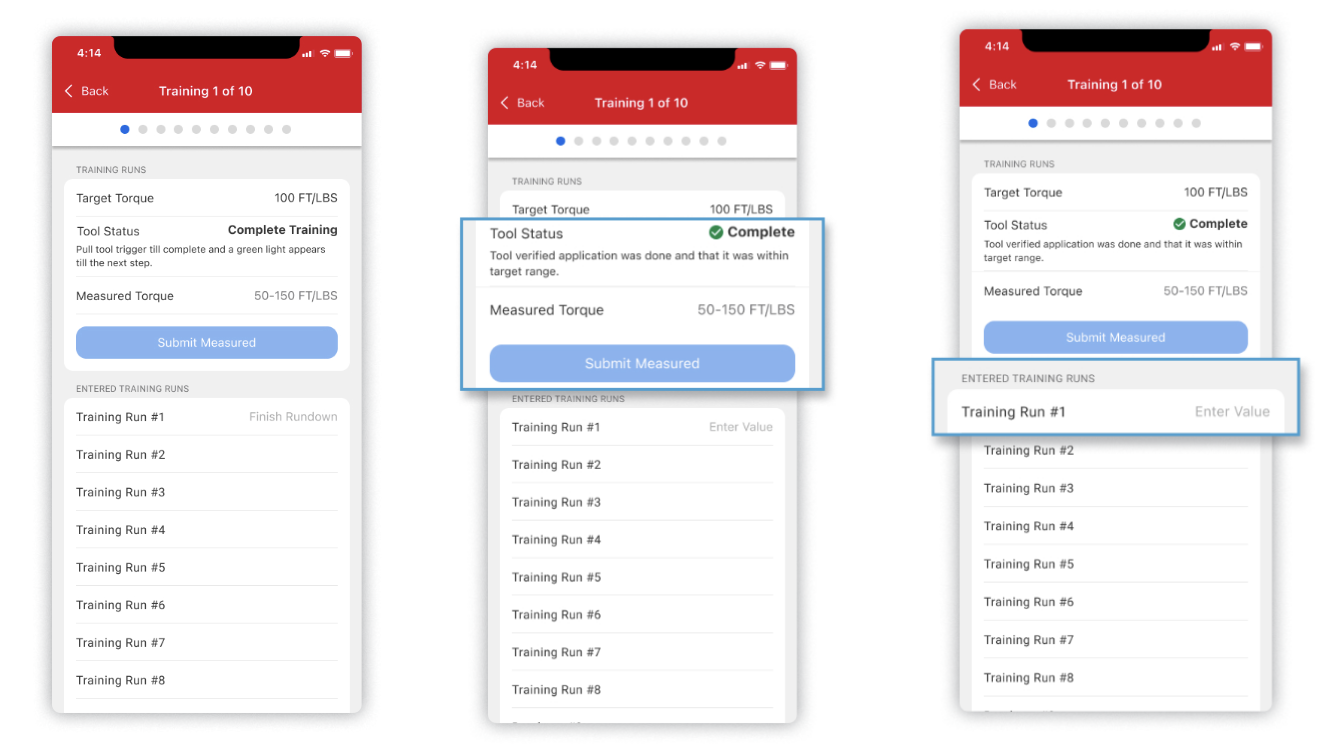
- Select Training Run #1 to begin and use the tool to rundown your first bolt – pull the trigger until the green light appears, which indicates a successful rundown. Following this step, we recommend verifying how much torque the tool output using a digital torque wrench:
-
- Measuring the torque output with a digital torque wrench, you’ll then use the “Enter Value” field to enter the torque value that the tool achieved in this rundown. Note: Because the tool is designed to progressively reach its target torque value over the course of these training rundowns, this first rundown may be as much as 50% lower than the desired torque value.
- You’ll perform 9 additional training rundowns and record each value verified with a digital torque wrench.
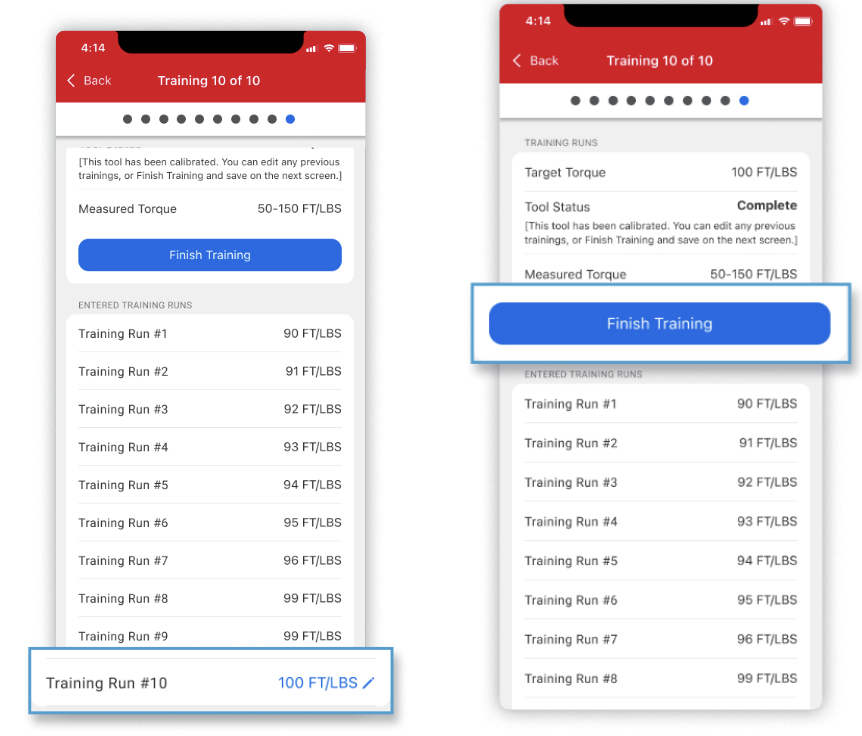
- Once you’ve completed your 10 training rundowns and entered their torque values, you’ll tap “Finish Training.”
- You then will save this mode to your tool and/or mode library. You will now have the option to apply this mode to any (or all) of the modes on your tool.
- Once you've applied and enabled TORQUE-SENSE™ to one of your modes, you will be able to use it for your application and get repeatable results. Be sure to use a calibrated torque wrench to verify the tool's output according to your quality procedures and train a new TORQUE-SENSE™ mode for each unique application.
You now know how to train your precision torque tool with TORQUE-SENSE™.
LED LIGHT CODE MATRIX
If you have questions on the product or believe TORQUE-SENSE™ tools may be a good fit for your jobsite and would like to demo the product, please reach out to our sales team: TorqueSupport@milwaukeetool.com