We want to help you keep track of all your tools, not just the ones made by Milwaukee®. That’s why we designed the One-Key mobile app to allow you to seamlessly integrate any tool of any brand or manufacture into your digital inventory.
In this article, we'll how you can add tools from any brand to One-Key using the mobile or web app.
You can select any of the below bulleted items to be taken to the corresponding section of this article where we discuss each of them:
- Learn how to add tools and equipment from other manufacturers on Android
- Learn how to add tools and equipment from other manufacturers on iOS
- Learn how to add a non-Milwaukee tool from scratch on Web
Get started on the One-Key mobile or web app
-
Log in to the One-Key mobile app or in your web browser.
-
The homepage, or Inventory Dashboard, will display on your screen.
How to add tools and equipment from other manufacturers on Android
Note: The screens featured in this article may appear different than what you see on your device due to different phone manufacturers having different procedures.
Whether they’re from the Milwaukee line or another, you can manage all your tools from your phone using the One-Key mobile app.
Here's how to add other manufacturers' tools to One-Key:
-
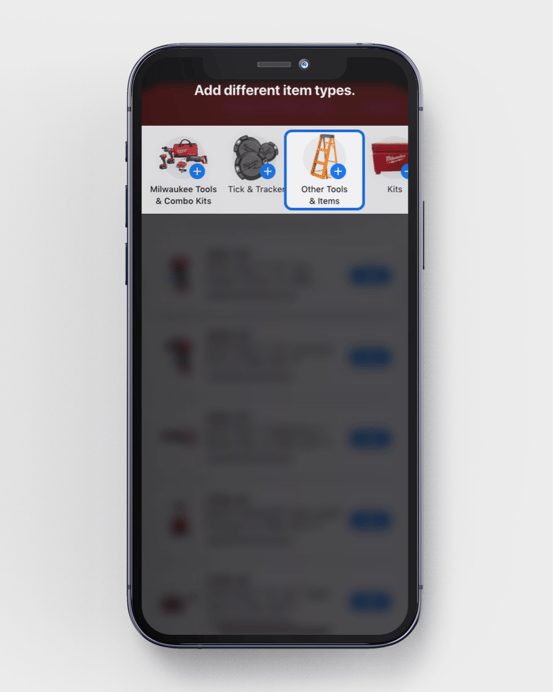
Starting from the Inventory Dashboard, tap the “+” sign in the upper right-hand corner of the screen choose "Other Tools & Items"

Once clicked, the Add Inventory Item page will display on your screen. From here, you can add a photo, manufacturer, and the following details to your tool:
-
Description: Brief description of your tool (required).
-
Model #: The model number of this line of tool (required).
-
Category: The type of tool.
-
Person: Crew member your tool is assigned to.
-
Division: The team that your tool is assigned to.
-
Place: The place that your tool is assigned to.
-
Tool Number: The custom name/number that you’ve given your tool.
-
Serial #: The serial number of this specific tool.
-
Status: Availability or physical condition of your tool.
-
Purchase Information: Value of your tool, date/place of its purchase.
-
Service Date: Date for routine maintenance/repair.
-
Assign barcode: Enter a trackable barcode number.
-
Add Nearby TICK™: Add an external Bluetooth® tracker.
Once you’re finished, tap the “Save” icon in the upper right-hand corner of the final screen to save the tool to your inventory. Make sure all the required fields are filled out.

Your equipment has been added to your One-Key inventory.
How to add tools and equipment from other manufacturers on iOS
Whether they’re from the Milwaukee line or another, you can manage all your tools from your phone using the One-Key mobile app.
-
Starting from the Inventory Dashboard, tap the “+” sign in the upper right-hand corner of the screen.
- Choose “Other Tools & Items”
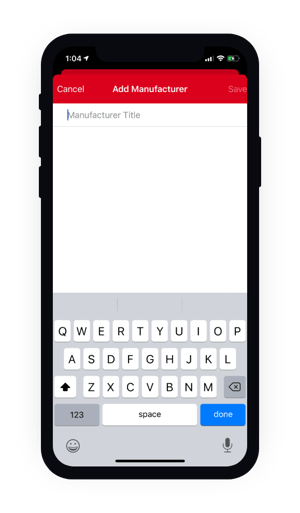
- To add another manufacturer's tools, tap the “+” sign in the upper right-hand corner of the screen. Now enter the name of the non-Milwaukee Manufacturer into the Manufacturer Title box. The newly entered manufacturer name will display on the following screen.
-
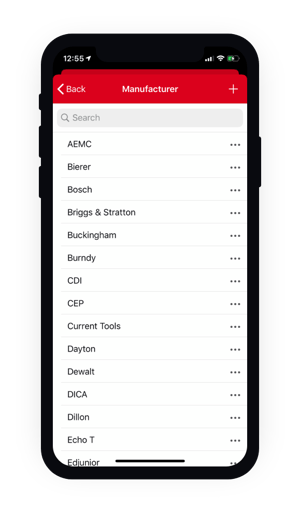
Tap the name of the non-Milwaukee manufacturer. The Add Inventory Item page will display on your screen. From here you can add a photo, and the following details to your tool:
-
Description: Brief description of your tool (required).
-
Model #: The model number of this line of tool (required).
-
Category: The type of tool.
-
Person: Crew member your tool is assigned to.
-
Division: The team that your tool is assigned to.
-
Place: The place that your tool is assigned to.
-
Tool Number: The custom name/number that you’ve given your tool.
-
Serial #: The serial number of this specific tool.
-
Status: Availability or physical condition of your tool.
-
Purchase Information: Value of your tool, date/place of its purchase.
-
Service Date: Date for routine maintenance/repair.
-
Assign barcode: Enter a trackable barcode number or asset ID tag.
-
Add Nearby TICK™: Add an external TICK Bluetooth® or equipment tracker.
Once you’re finished, tap “Save” in the upper right-hand corner of the final screen to save the tool to your inventory. Make sure all the required fields are filled out.

Your equipment has been added to your One-Key inventory.
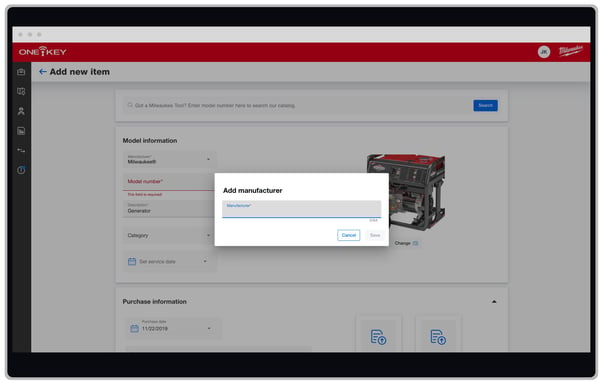
How to add a non-Milwaukee tool from scratch on Web
Manage all of your tools in One-Key from your computer, whether they’re from the Milwaukee line or another. This section will explain how to add a new tool from a different manufacturer to your inventory, completely from scratch.
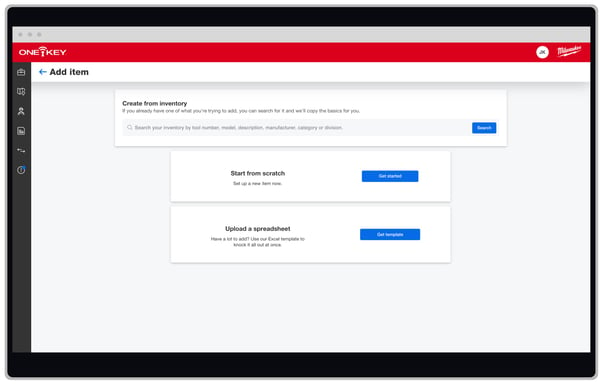
- Starting from the Inventory Dashboard, click the blue “Add item” button in the upper right-hand corner of the screen.
- Next, click the blue “Get started” button in the Start from scratch box near the center of the screen.
- Under Model Information, click the Manufacturer drop-down menu. From here, you can scroll down until you see the manufacturer of your tool. Click on the manufacturer, or enter the name into the search bar at the top of the drop-down menu.
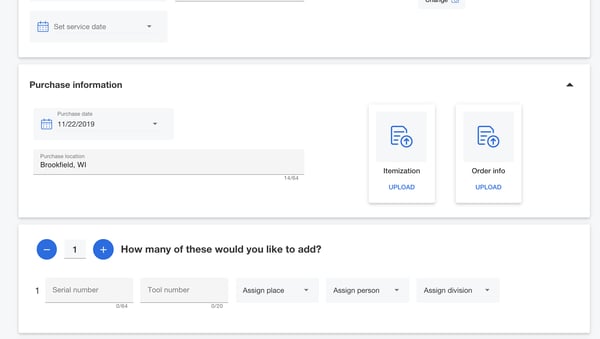
- Now you can enter the tool’s photo, description, model number, category, value, and the last date it was serviced. You can also set a new service date.
- You can also enter in the item’s purchase information from this screen.
- Once you’ve entered all the details you wish to include about your new item, click the blue “Save” button at the bottom of your screen. Make sure you’ve filled out all the required fields—manufacturer name, model number, and description—or you will not be able to advance.
Now your newly created tool will appear in your list of tools at the Inventory Dashboard.
Now you know how to use One-Key to keep track of all your tools.