Your tools are going to float from project to project, and there are plenty of opportunities for them to go missing between jobsites. The One-Key mobile app helps you avoid the pitfalls of a large-scale inventory with the Tool Transfer feature.
In this article, we'll show you how to make a tool transfer on Android, iOS, and Web.
You can select any of the below bulleted items to be taken to the corresponding section of this article where we discuss each of them:
- Learn how to make a tool transfer on Android
- Learn how to make a tool transfer on iOS
- Learn how to make a tool transfer on Web
- Tool Transfers Using an Asset Tag or Barcode
Get started on the One-Key app on Android, iOS, or Web
-
Log in to the One-Key mobile app.
-
The homepage, or Inventory Dashboard, will display on your screen.
Make a tool transfer on Android
Note: The screens featured in this article may appear different than what you see on your device due to different phone manufacturers having different procedures.
Juggling multiple projects requires the nimbleness and agility of a skilled inventory manager. One-Key empowers these logistics experts by enabling them to digitally transfer and keep track of your tools as they move from one place to the next.
Here's how to make a transfer on Android:
- When you launch the mobile app, tap from your inventory list to “Places” on the navigation bar at the bottom of your screen.
-
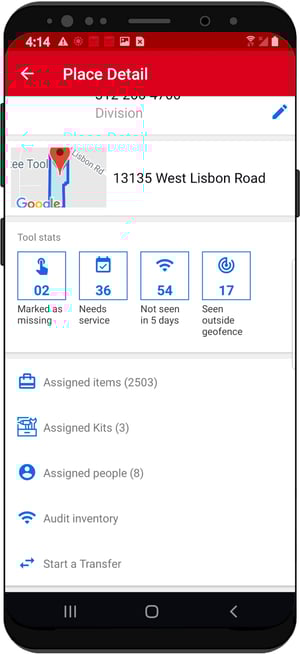
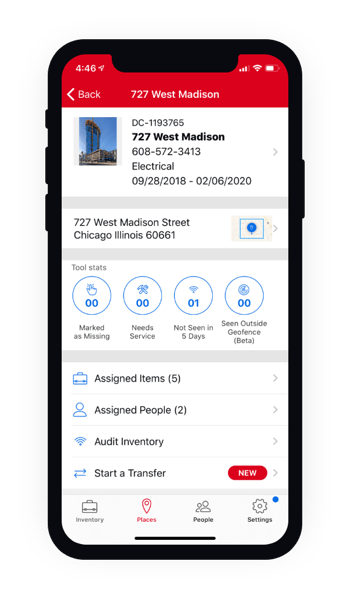
Now tap on the location you’d like to make a tool transfer from. This will open the information card on that particular place.
-
Next, scroll to the bottom of the page and tap “Start a Transfer.” This will bring you to a list of all the items you have assigned to your selected place.
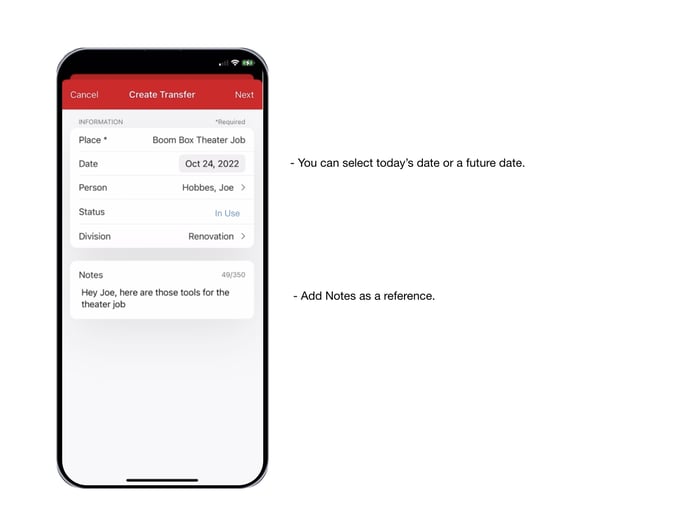
Next, you'll create your transfer:
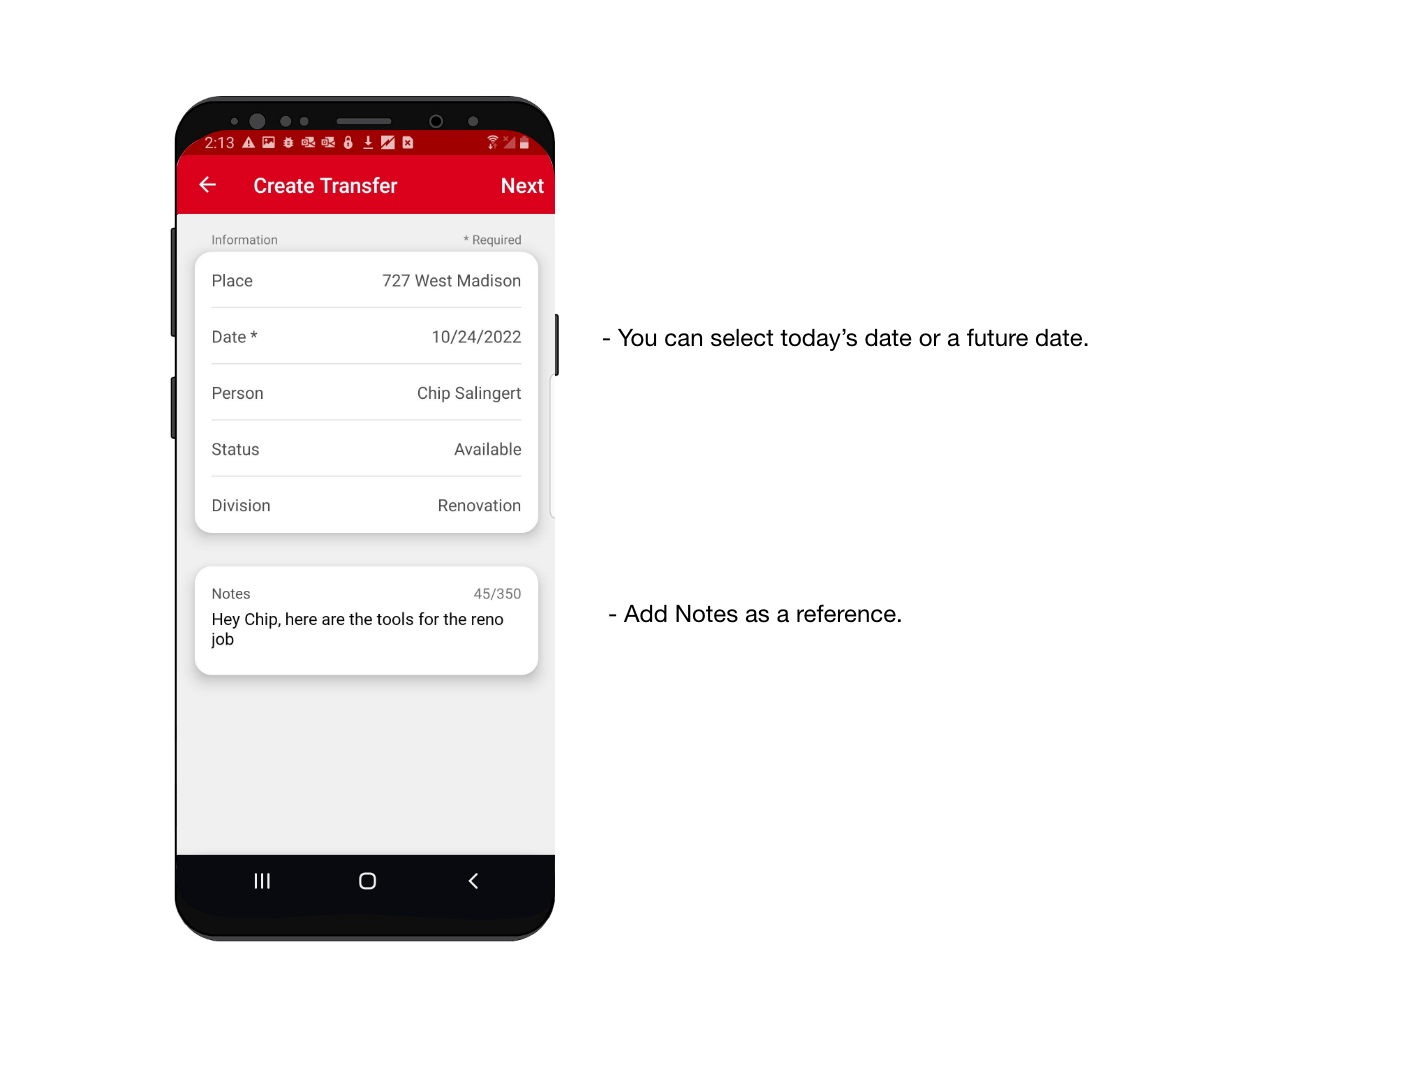
- Select where you’re sending inventory to or from.
- Select a date – you can select for this transfer to occur on the present day or set it up in the future if you’re scheduling tools to be delivered on a future date, such as the day they’re to arrive at the start of a new project, helping you automate bulk tool sends and stay on top of everything with multiple projects.
- Select a person, which allows you to add accountability by electing the person that is responsible for these items.
- Set a division to signal which team is taking ownership of these tools.
- Add notes to your transfer. You can change the status of the tools that are being transferred. You can use this field as a reference when looking back on these transfers later, providing context on the transfer, and this is also why we recommend adding details in these notes, as they could prove invaluable later on.
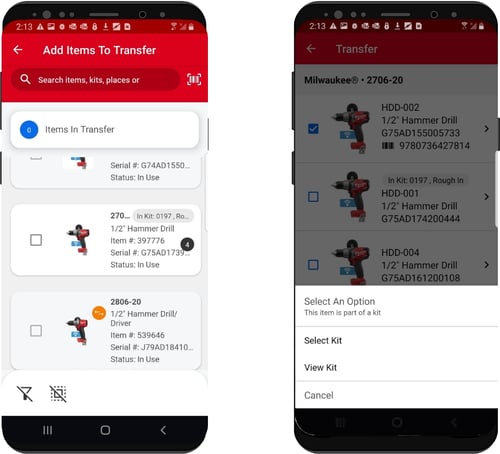
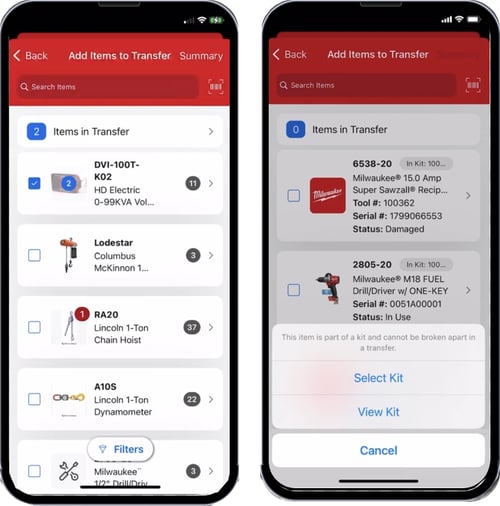
Next, decide what you’re sending:
-
- If you have items on-hand that you’re sending out, or perhaps a kit you’re sending in bulk, you can tap the barcode icon to scan and bring this item and kit information up and add it to your transfer.
- You can also use the search bar to type in an item by description to find and add it to your transfer.
- Select the items you’d like to add to this transfer. If the item is part of a kit, you’ll be prompted to select the entire kit.
-
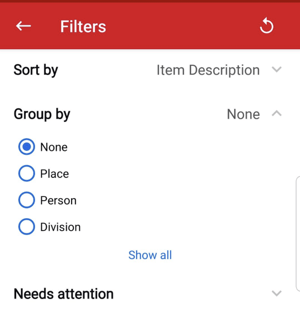
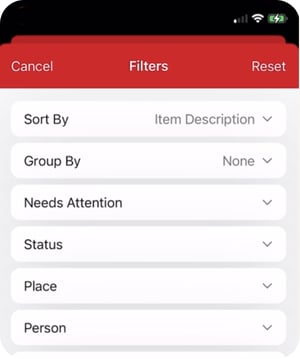
- You can also use “filters” like sorting by specific item descriptions, model numbers, or tool numbers; grouping by specific places, people, or divisions, and filters such as items that are flagged as “available,” in order to better yield the items you’re looking for faster.
- Once you’ve selected the items or kits you’re sending in this transfer, select “Submit transfer.”
- On the next screen, you’ll be shown a “Success” notification informing you that your transfer has been You can scroll to the bottom and tap to view and share your transfer report via email or to your device.
- You can also use “filters” like sorting by specific item descriptions, model numbers, or tool numbers; grouping by specific places, people, or divisions, and filters such as items that are flagged as “available,” in order to better yield the items you’re looking for faster.
Now the tools from one place will display in your inventory as having been transferred to another.
Make a tool transfer on iOS
Juggling multiple projects requires you to be nimble with your inventory. One-Key makes it easy to digitally transfer and keep track of your tools as they move from one place to the next.
- Starting from the homepage, tap the “Places” button on the navigation bar at the bottom of your screen.
-
Now tap on the location you’d like to make a tool transfer from. This will open the information card on that particular place.
-
Next, scroll to the bottom of the page and tap “Start a Transfer.” This will bring you to a list of all the items you have assigned to your selected place.
Next, you'll create your transfer:
- Select where you’re sending inventory to or from.
- Select a date – you can select for this transfer to occur on the present day or set it up in the future if you’re scheduling tools to be delivered on a future date, such as the day they’re to arrive at the start of a new project, helping you automate bulk tool sends and stay on top of everything with multiple projects.
- Select a person, which allows you to add accountability by electing the person that is responsible for these items.
- Set a division to signal which team is taking ownership of these tools.
- Add notes to your transfer. You can change the status of the tools that are being transferred. You can use this field as a reference when looking back on these transfers later, providing context on the transfer, and this is also why we recommend adding details in these notes, as they could prove invaluable later on.
Next, decide what you’re sending:
- If you have items on-hand that you’re sending out, or perhaps a kit you’re sending in bulk, you can tap the barcode icon to scan and bring this item and kit information up and add it to your transfer.
- You can also use the search bar to type in an item by description to find and add it to your transfer.
- Select the items you’d like to add to this transfer. If the item is part of a kit, you’ll be prompted to select the entire kit.
- You can also use “filters” like sorting by specific item descriptions, model numbers, or tool numbers; grouping by specific places, people, or divisions, and filters such as items that are flagged as “available,” in order to better yield the items you’re looking for faster.
- Once you’ve selected the items or kits you’re sending in this transfer, select “Submit transfer.”
- On the next screen, you’ll be shown a “Success” notification informing you that your transfer has been You can scroll to the bottom and tap to view and share your transfer report via email or to your device.
Now the tools from one place will display in your inventory as having been transferred to another.
Transfers (Web) Overview
In this section of the article, we’ll show you where you can initiate a transfer from the web app, as well as demonstrate how to initiate a transfer and make the most out of this feature.
Jump Ahead:
Transfer Recap
New to transfers? Here’s a quick recap of where you can initiate a transfer from:
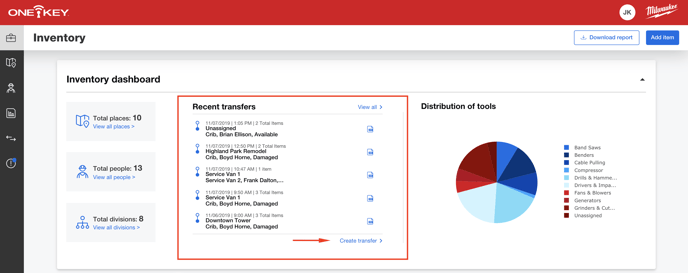
- From your inventory dashboard, you can view your recent transfers to get a high-level overview of what’s happening across your tool inventory and jobs or start a transfer; you can also create a transfer from here.
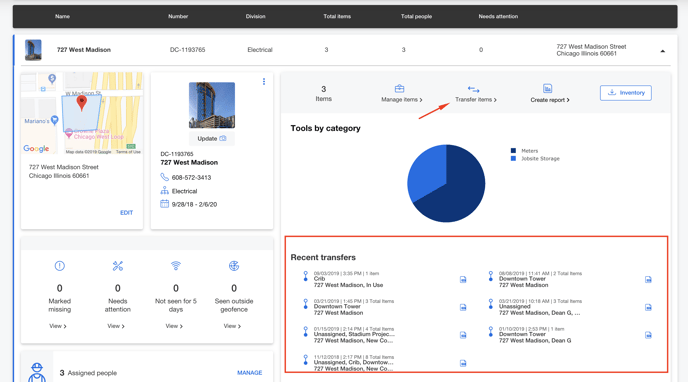
- You can view your transfers at the jobsite-level by clicking into Places, then selecting one of your Places; recent transfers to and from this location can be seen here, or you can start a transfer.
- You can also view transfers at the individual team member-level by clicking into People, then selecting a team member. You’ll see their recent transfers and you can create a new transfer.
 Initiating a Transfer (Updated)
Now, let’s show you how to initiate a new transfer and take advantage of some of the new improvements:
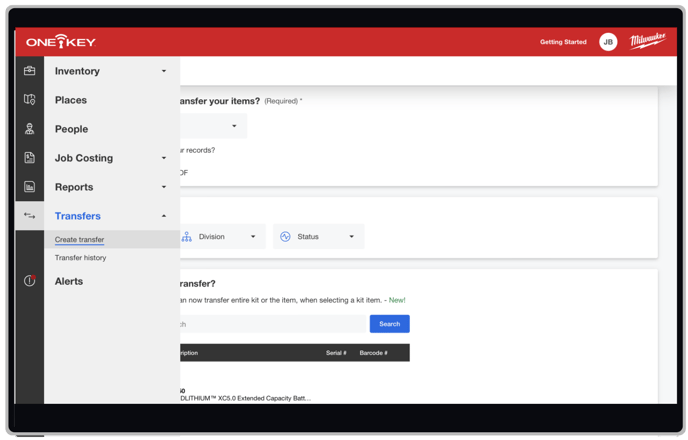
- When you select Transfers along the navigation menu in the lefthand side of your screen, you can select to start a new transfer or view your Transfer History. Let’s start a new transfer.
- On the Create Transfer screen, there is some new functionality we’ve added. You can tap “Learn more” to learn about some of these new features,
- such as being able to schedule your transfers,
-
- our new and improved search,
-
- the ability to customize your items in your transfers by the way you’d like them to be displayed,
-
- as well as being able to take advantage of the full screen in search.
Let’s create that transfer:
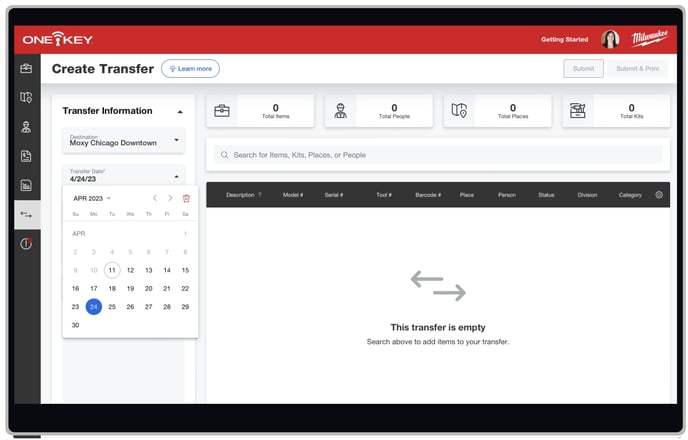
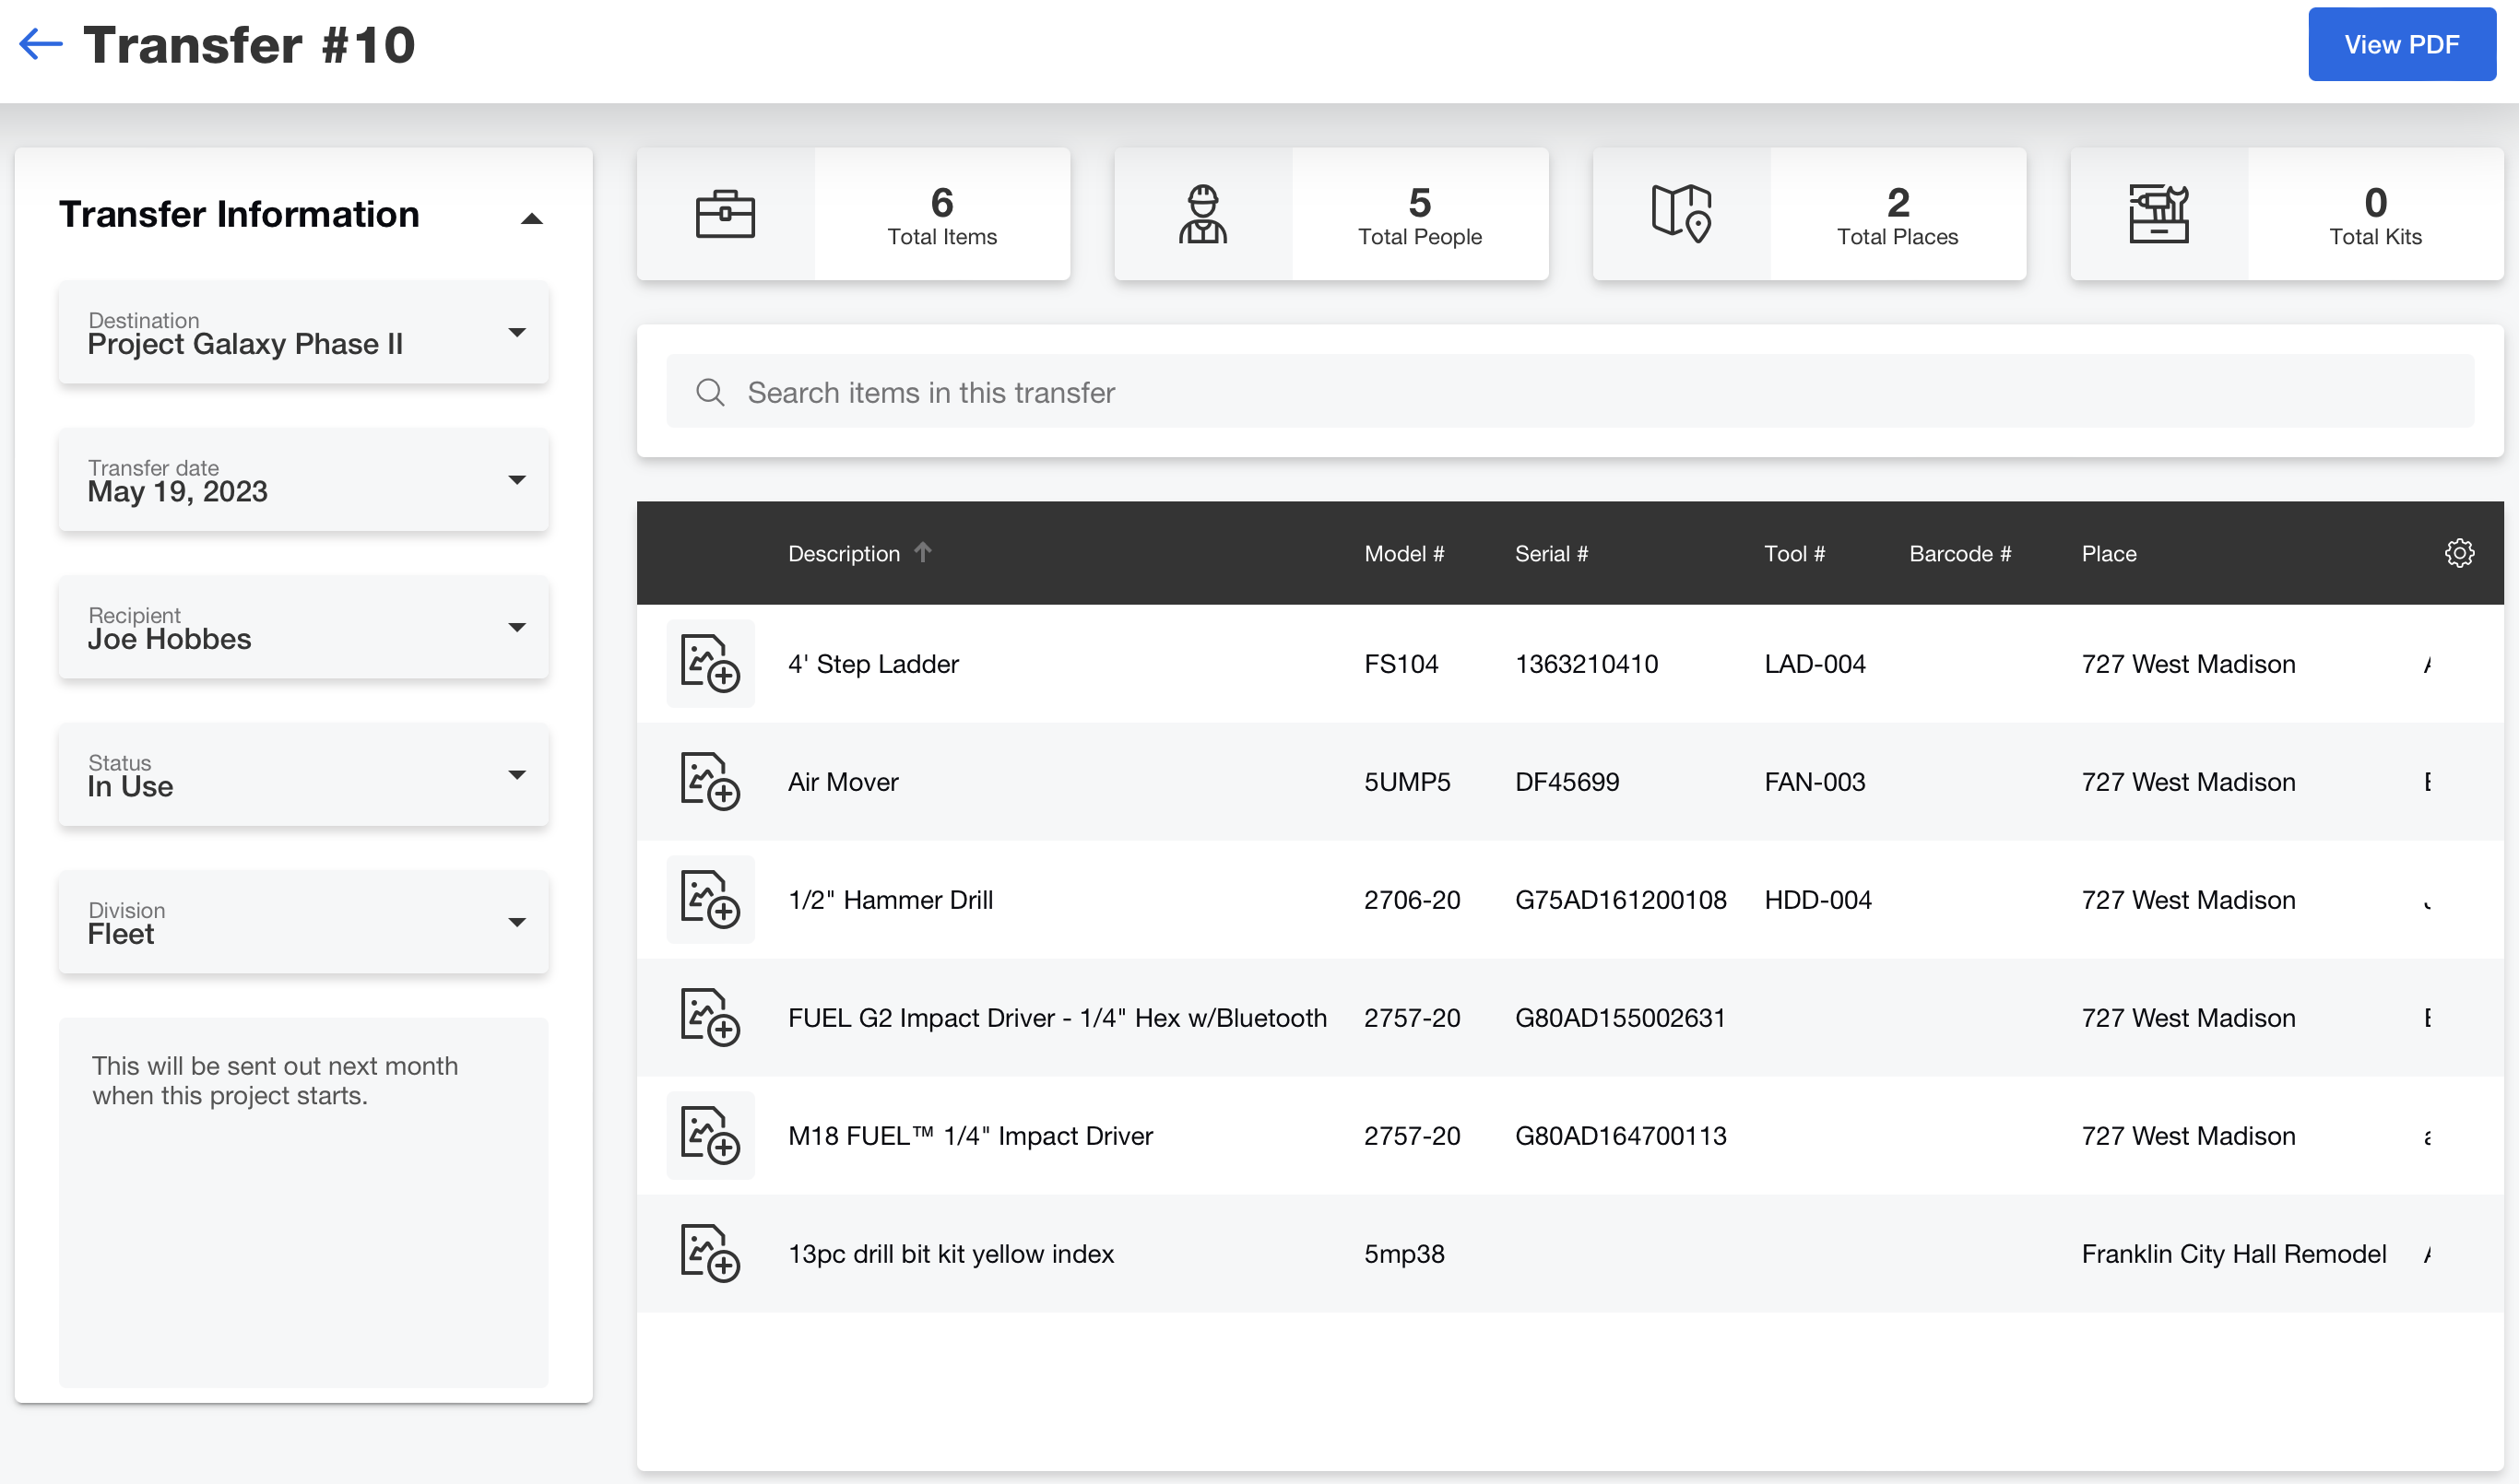
- First, when setting up your transfer, select the “Destination” you’re sending it to. This field used to be called “Place.”
- You now will also see a new, required field below this: Transfer date. This field, now required, ensures busy teams managing your inventory will have a reference of when this transfer was created —the transfer date reflects the date the tools in this transfer will be delivered to the destination. You can select for this transfer to occur on the present day or set it up in the future if you’re scheduling tools to be delivered on a future date, such as the day they’re to arrive at the start of a new project. This feature will help your tool team automate bulk tool sends and stay on top of everything as multiple projects begin. And don’t worry, if you need to cancel a future dated transfer after it’s initially created, doing so is easy, and we’ll show you how after this transfer has been created; you’ll also be able to mark a future dated transfer complete if it ends up getting transferred sooner than expected. We’ll show you how to do that, too.
- You can also add a recipient for this transfer for added accountability.
- You can change the status of the tools that are being transferred.
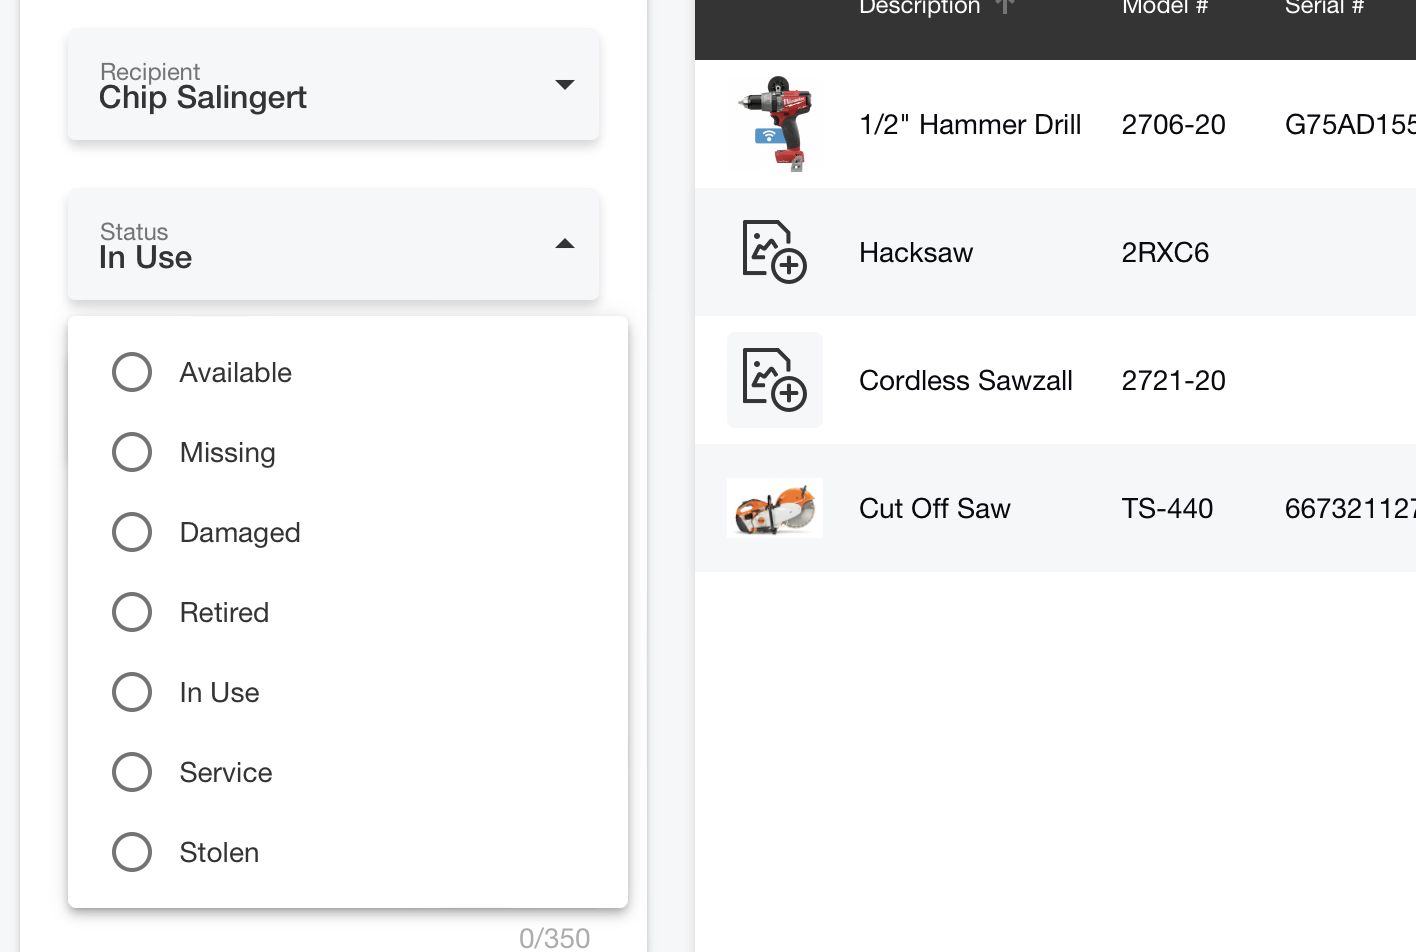
- You can also set a division to signal which team is taking ownership of these tools.
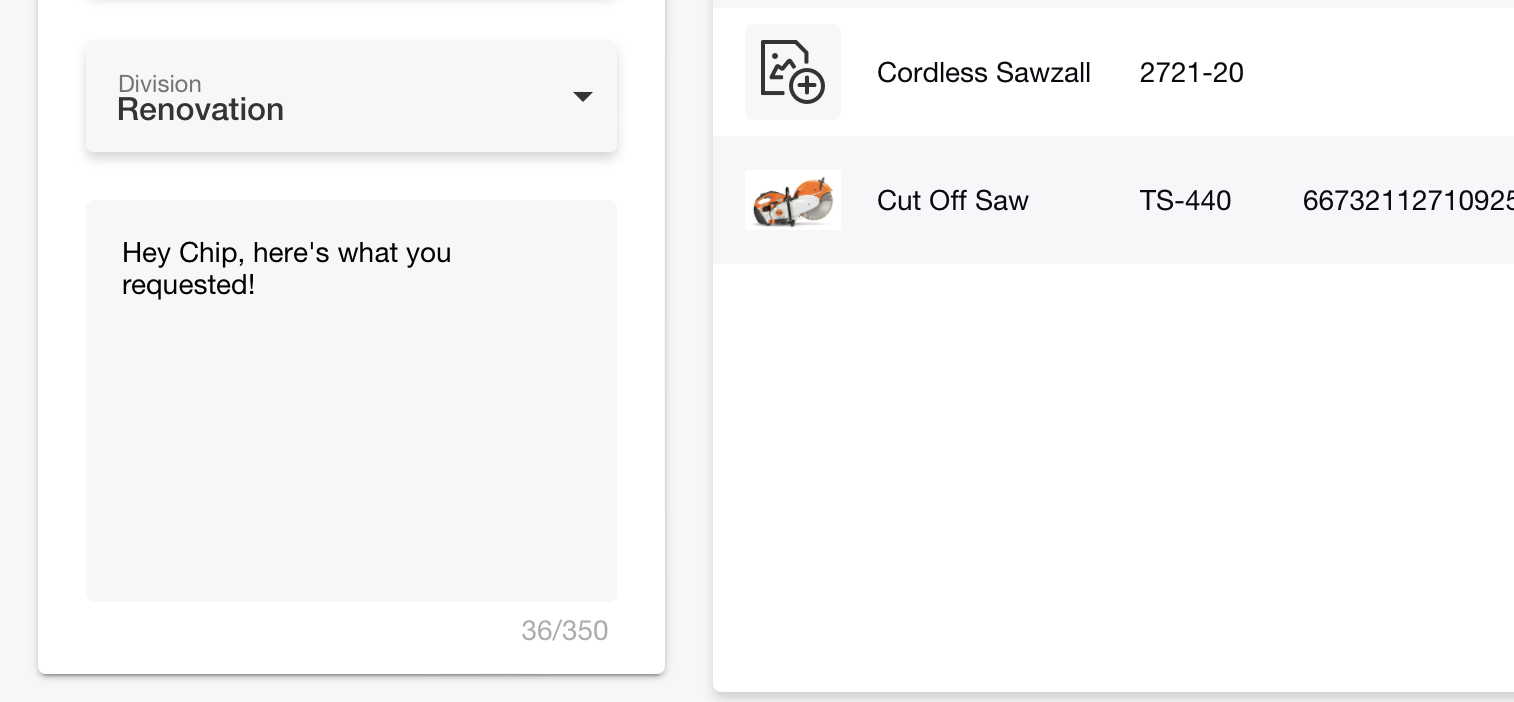
- We’ve also added the ability to add notes to your transfer. You can use this field as a reference when looking back on these transfers later, providing context on the transfer, and this is also why we recommend adding details in these notes , as they could prove invaluable later on.
- Now it’s time to decide what you’re sending:
-
- You can elect to collapse the “Transfer information” section if you’d like to take advantage of the full screen view while adding items.
- Across the top, you’ll now see a search bar; previously, this screen was automatically filled with inventory, but we’ve added advanced search functionality that now lets you find things easier by either typing in a keyword.
- You can elect to collapse the “Transfer information” section if you’d like to take advantage of the full screen view while adding items.
-
- You can, for example, search by typing in a keyword, such as “drill” or “impact,” to yield all items relevant to this search query.
- You can type in the name of a place to yield all items related to this place’s name; you can also scroll down to find the specific place you’ve searched to open all items in this place’s inventory.
-
- Similarly, you can type a person’s name to yield all items related to their name, or find them to open their assigned inventory from this search.
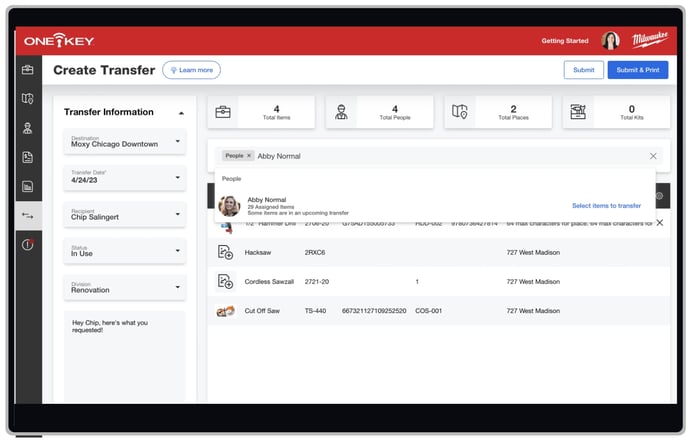
-
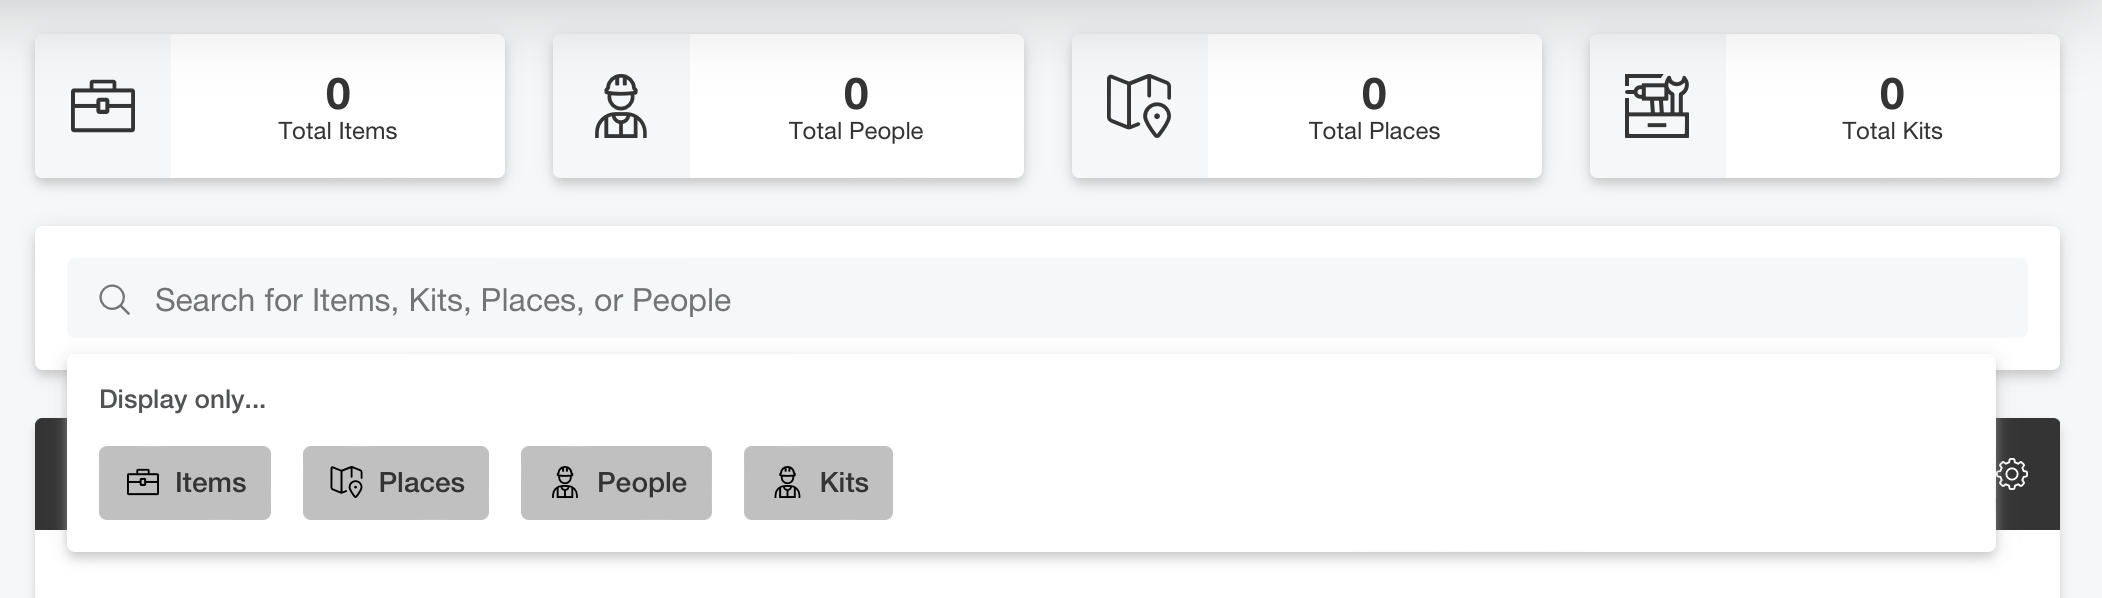
- Additionally, you can use “Display only…” to add search parameters and narrow down what displays as you type in a keyword or phrase.
-
- Add up to 1,000 items to this transfer and green check marks will display by them as they’re added to your cart.
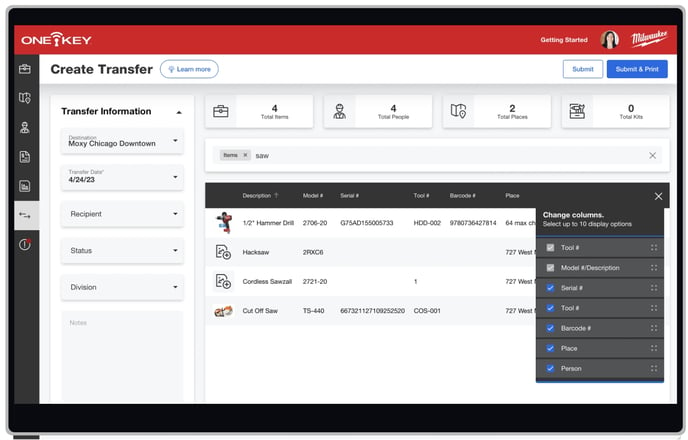
- When you search for the items you want to add in this transfer, you can also select the gear indicator on the far righthand side of your screen to change the columns that appear; you can select up to 10 display options based on what you find important to display.
-
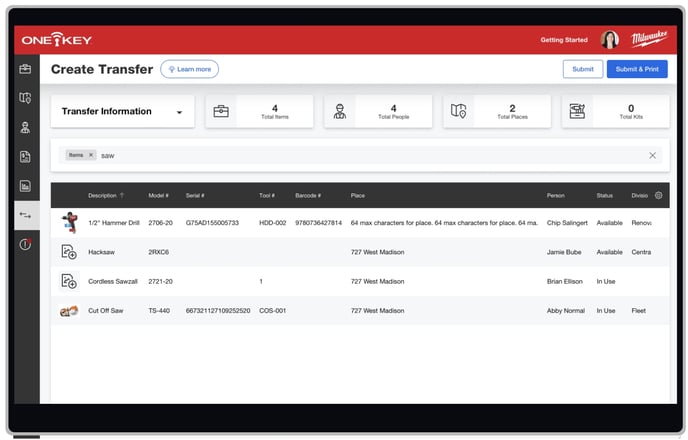
- At the top of the screen, you’ll also notice we’ve added an overview section which gives you some important, high-level information, such as how many people or jobsites are affected by this transfer.
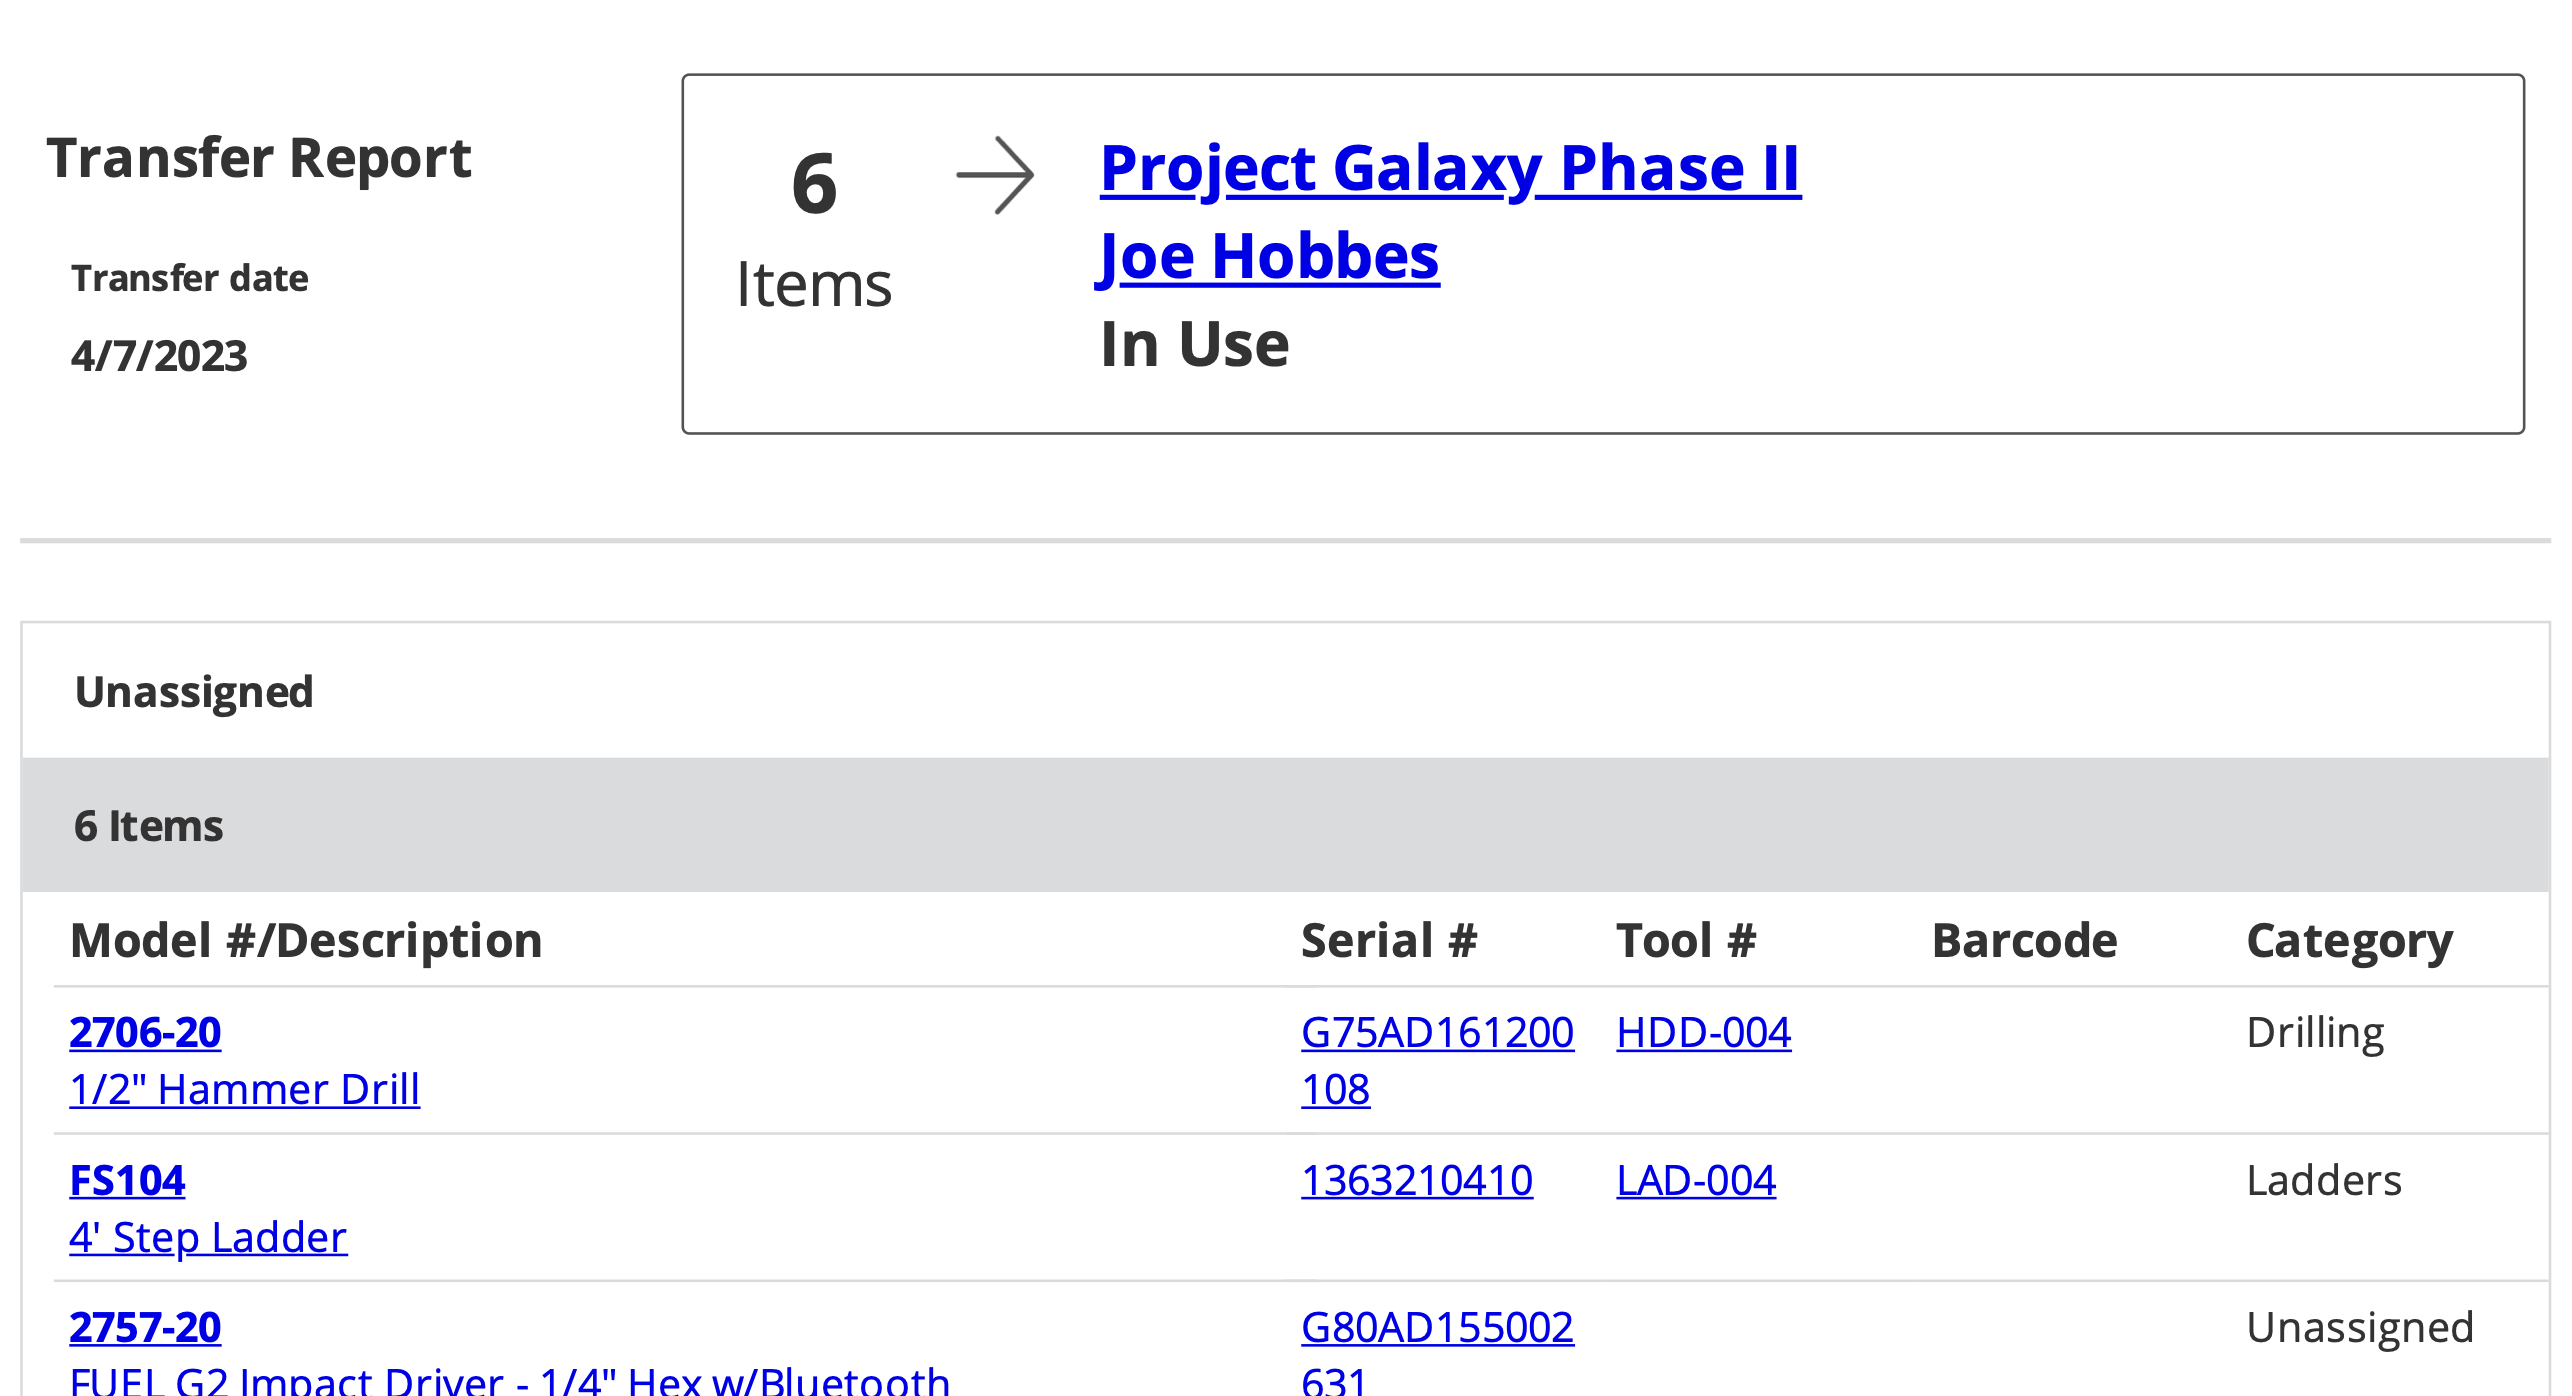
- When you’re ready to complete the transfer, you can select either Submit or Submit and Print, the latter which will open the PDF report in a new tab for easy access. Saving or printing off a PDF copy of your transfer is a great way for a team member to physically signoff on your transfer before they leave the crib, or you’ll have the file as a reference you can attach to an email to a stakeholder for added accountability. But don’t worry, if you find that you need a printoff of this transfer later, it can be accessed in your transfer history.
Transfer History
Let’s now show you some improvements we’ve made to transfer history:
- When you tap into your transfer history, you’ll now see a much more robust chronicling of both completed and upcoming transfers. You can use the filters at the top of your screen to narrow down what displays if you’re looking for a specific transfer:
-
- You can filter down to transfers at specific places, or you can get even more granular:
-
-
- You can filter transfers associated with specific people, or even transfers created by specific people.
-

-
-
- You can filter by transfers associated to certain places, status, or divisions, if you’re looking for items associated with a certain team.
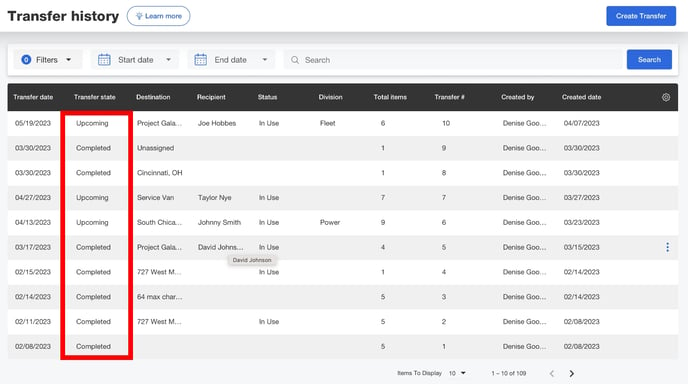
- You can filter down by “transfer state” if you want to, for example, find all upcoming transfers. Transfer states include: Upcoming, completed, and canceled.
-
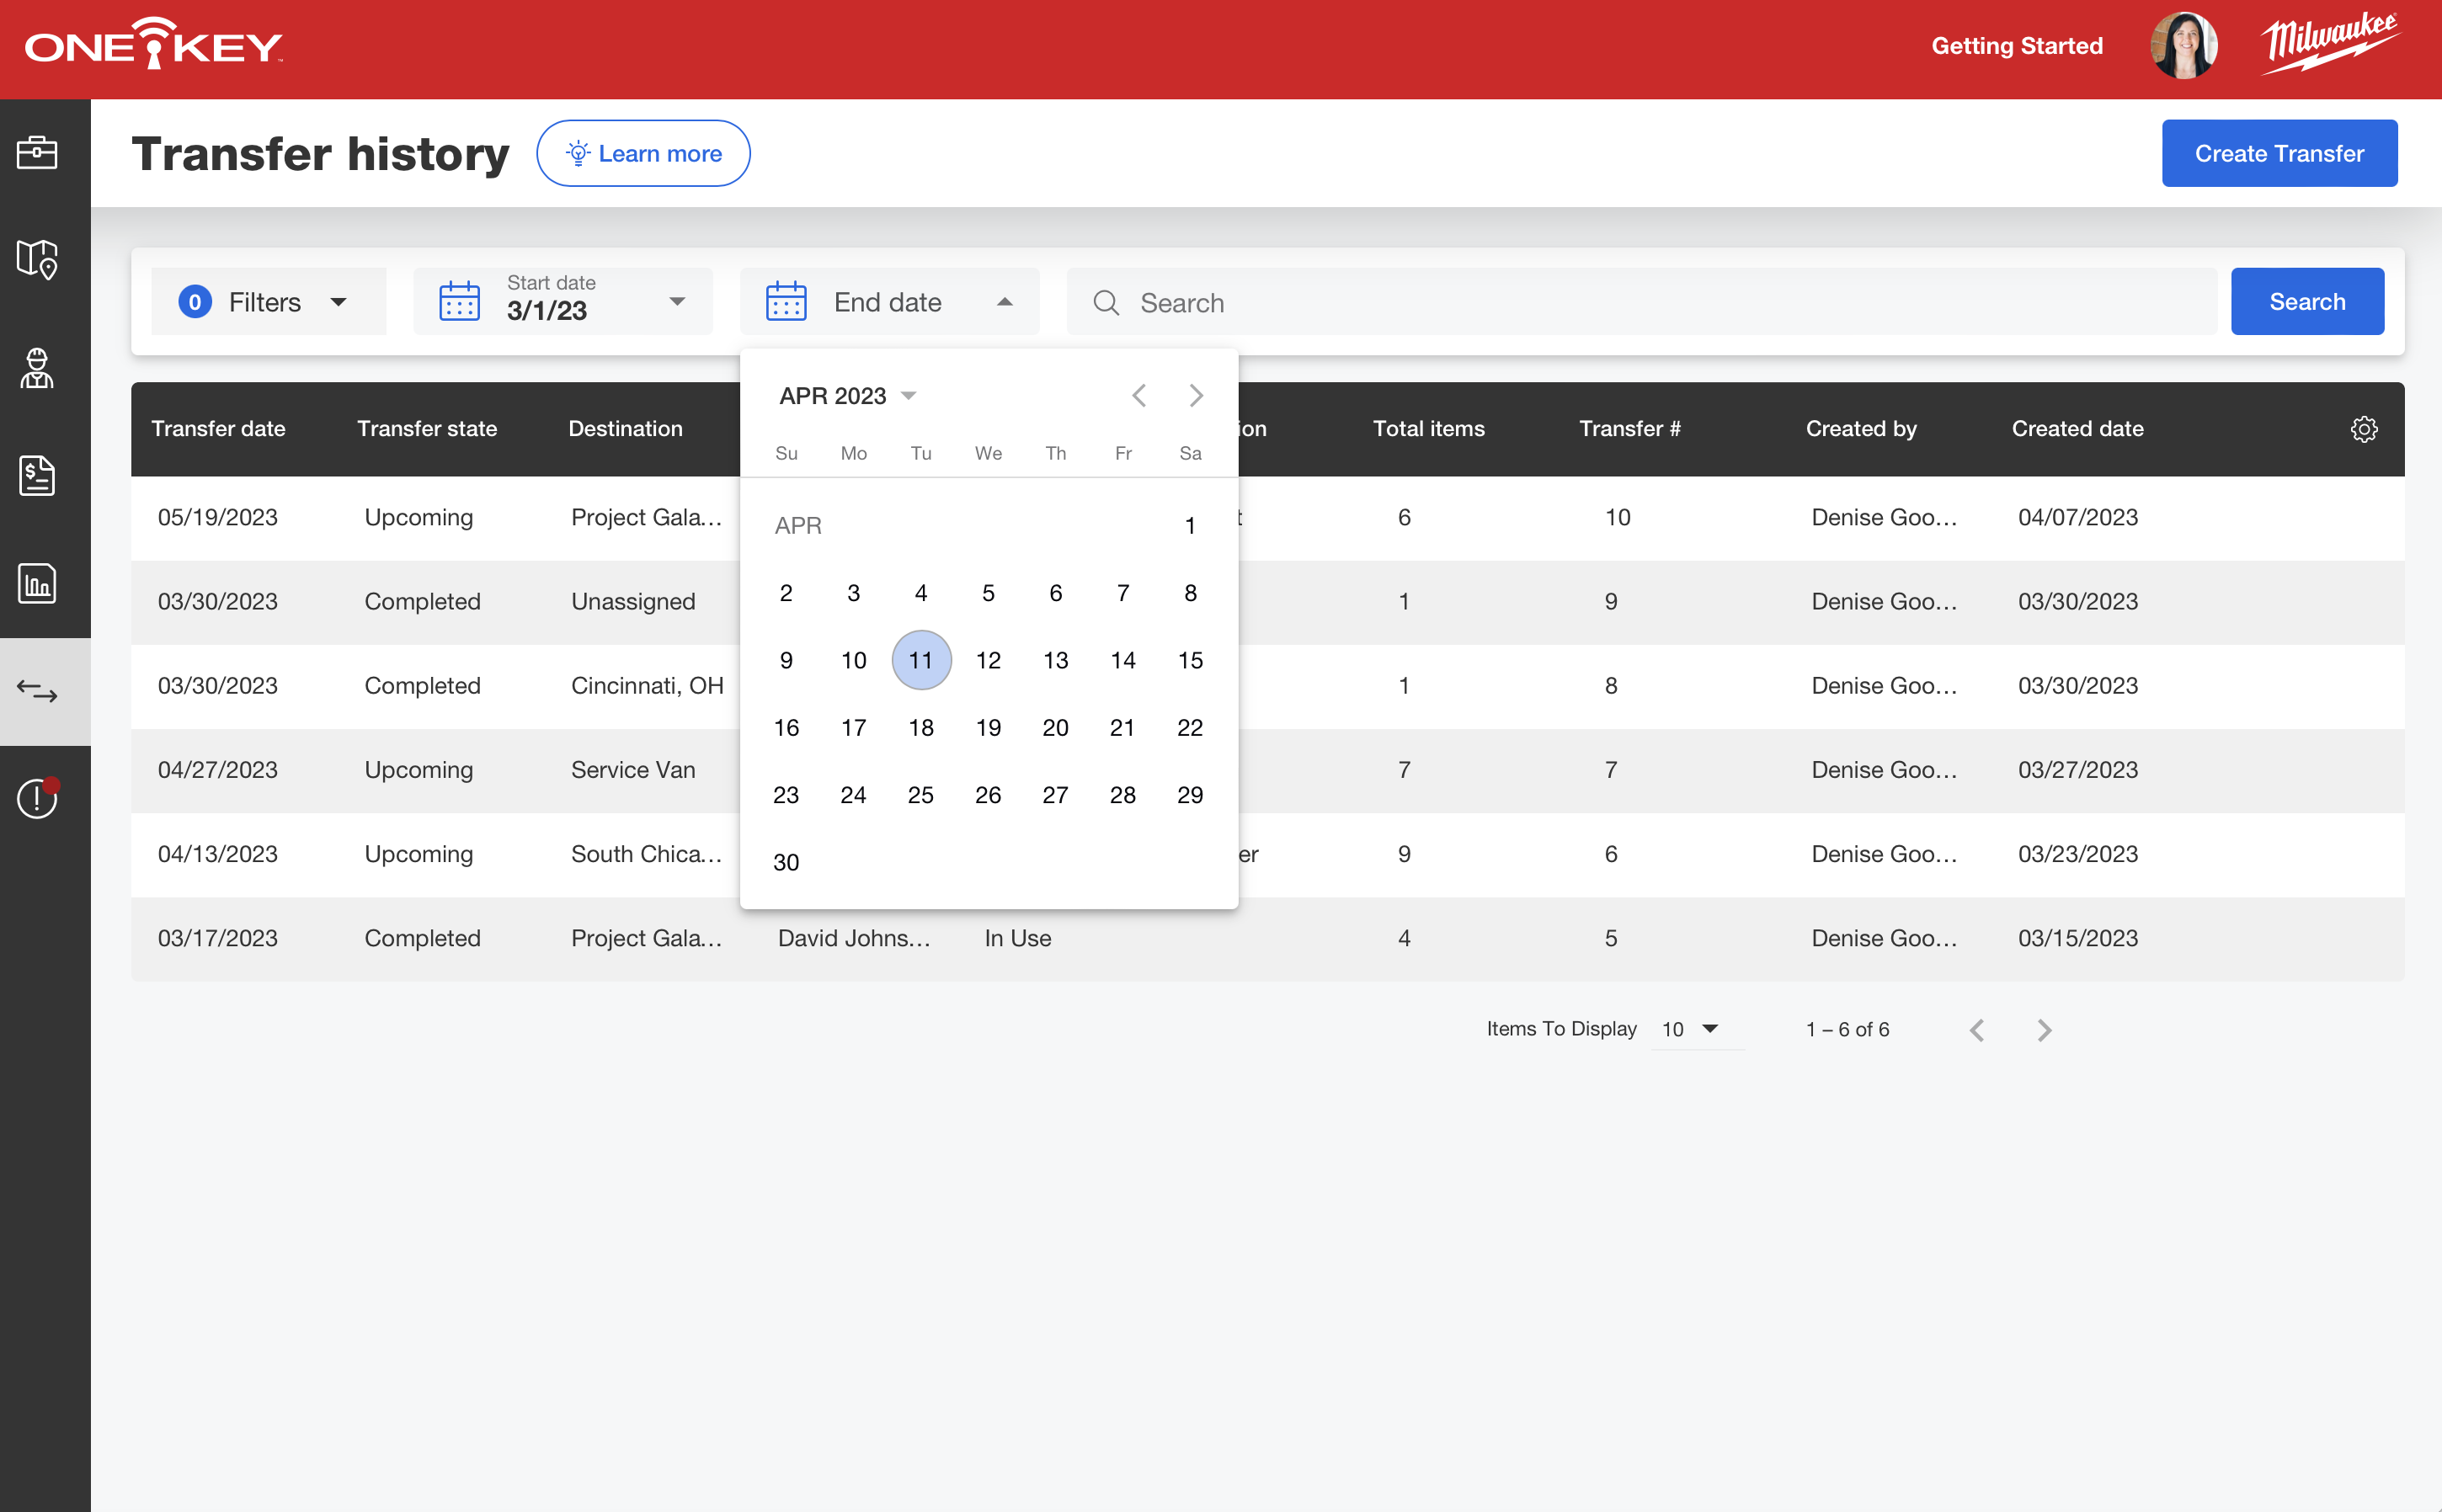
- Outside of filters, you can apply a specific date range or use the search bar to search by keyword or phrase.
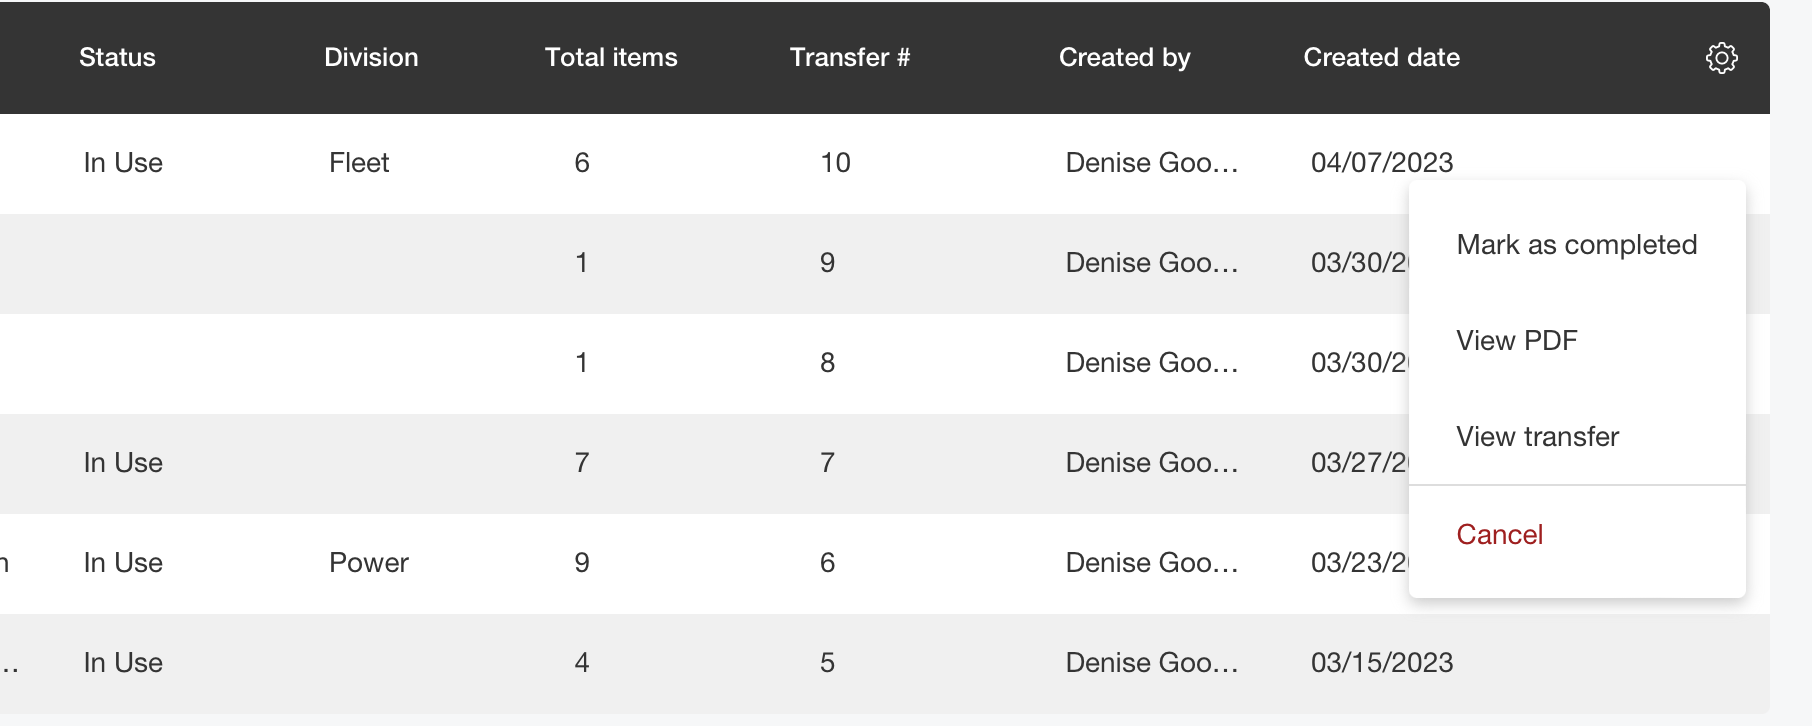
- If you want to drill down into a specific transfer to inspect it, hover over the transfer item and a blue overflow icon will appear.
- If you’re looking at a completed transfer, using the overflow icon on a gives you two options:
-
- You can select “View transfer,” which will take you to a screen that shows you this transfer as it was made on the date of its creation and give you all the information you may need to understand why the transfer was made;
-
- You can also use the overflow icon to view that PDF printoff we mentioned and save it to your computer;
- If you’re looking at an upcoming transfer, on the other hand, there are a couple additional options:
-
- In addition to being able to view the transfer or its PDF to familiarize yourself with this transfer, you can also:
-
-
- Mark it completed if the transfer has occurred faster than scheduled.
-
-
-
- You can also cancel the transfer if it’s no longer needed. Doing this will revert the items to their previous assignments.
-
We’ve helped to add more accountability by making transfers more seamless. With more robust transfer functionality, tool teams are empowered to automate inventory logistics while being able to reference back on their tool sends with much greater context.
Tool Transfers Using an Asset Tag or Barcode
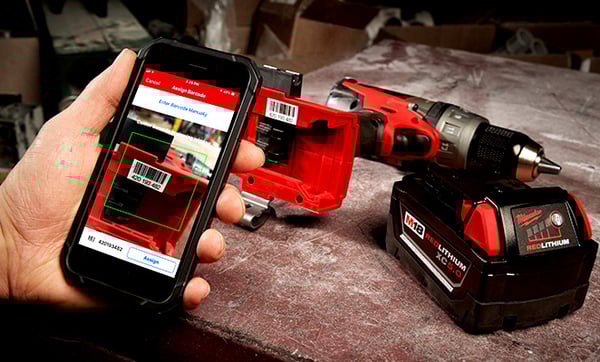
The in-app scanner within One-Key lets you assign Asset ID Tags, and to find where a tagged or barcoded item belongs by scanning it using your smartphone's camera. This eliminates the need for expensive standalone scanning hardware. In addition to quick lookups, One-Key's barcode reader also allows you to easily transfer tagged and barcoded items between jobsites.
In this section of the article, we’ll show you how to complete a tool transfer using an Asset ID Tag or barcode on Android and iOS.
- Learn how to complete a transfer using an asset ID Tag or Barcode on Android
- Learn how to complete a transfer using an asset ID Tag or Barcode on iOS
Get Started on Android or iOS
- Launch the app on your respective platform.
- Inventory will load by default. Along the bottom menu, tap “Places.”
- Select a project or job you want to transfer items from.
Transferring Tagged or Barcoded Tools and Equipment on Android
Note: The screens featured in this article may appear different than what you see on your device due to different phone manufacturers having different procedures.
- Once in your place’s details, scroll down and tap “Start a Transfer.”
- Your inventory items at this place will load.
- To add an item by scanning its barcode, tap the barcode icon on the righthand corner of your screen, located beside the search bar. When you center your item’s asset tag or barcode in the viewing window, by moving your item under your device’s camera, your item's barcode or asset ID tag number and associated details' card will auto-populate in your cart, like in the below example:
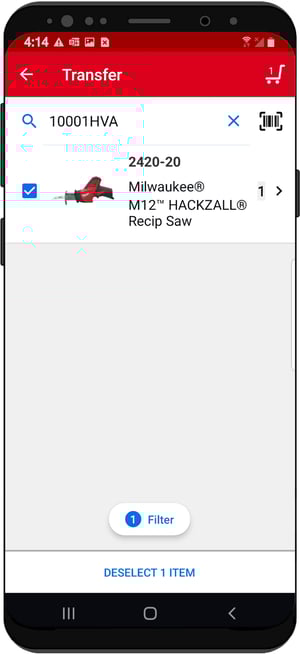
- Check the box located beside your item (as in the above example) to add it to your list of items to be transferred.. Repeat this process as many times as you need until you’ve got everything in the cart for your transfer.
Once the cart is full, finish the transfer process by selecting a destination and assignee.
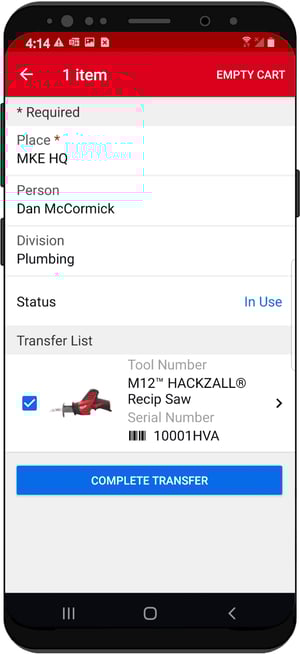
- We'll display a summary of the transfer you're about to complete (as seen below, in the screenshot on the left). If everything looks good, tap the "Complete."
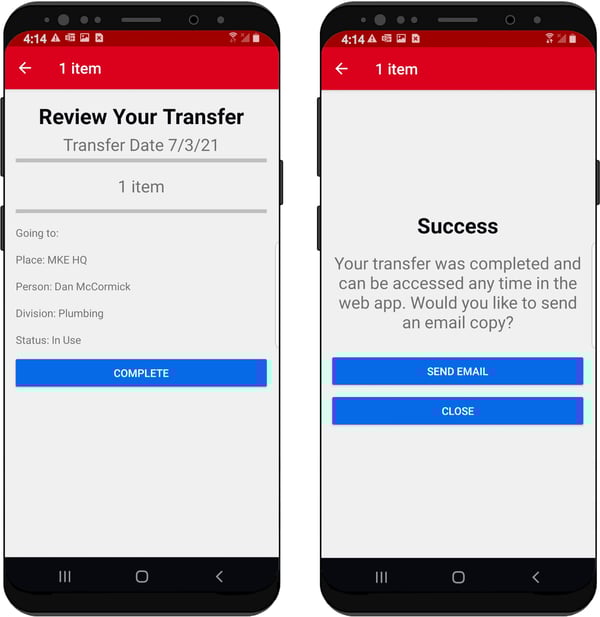
Once that’s completed, you can send a confirmation of the delivery to whoever needs to know (as displayed above in the screenshot on the right). We’ll save a copy for you in your transfer history that you can access whenever you need.
Transferring Tagged or Barcoded Tools and Equipment on iOS
- Once in your place’s details, scroll down and tap “Start a Transfer.”
- Your inventory items at this place will load. Tap the search icon to access the scanner, then the ‘Scan Barcode’ button.
- Center your item’s asset tag or barcode in the viewing window by moving your item under your device’s camera.
- When the item description appears, tap the ‘Add’ button. Repeat this process as many times as you need until you’ve got everything in the cart for your transfer.
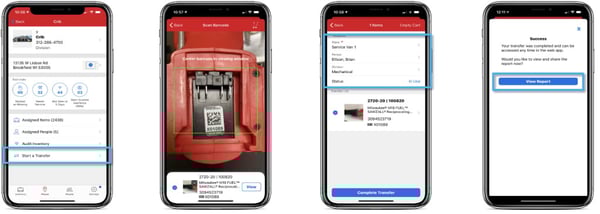
Once the cart is full, finish the transfer process by selecting a destination and assignee. Once that’s completed, you can send a confirmation of the delivery to whoever needs to know. We’ll save a copy for you in your transfer history that you can access whenever you need.
One-Key's scanner functionality makes transferring equipment with Asset ID Tags or barcodes fast and simple.
With the One-Key mobile app, you can easily transfer your tools from one place to another and keep the rest of your team in the loop.