In this article, we’ll show you how to take advantage of the job costing feature, a powerful inventory tool that’s accessible for free on the One-Key web app.
NOTE: Use custom permissions to manage access when maintaining and viewing Job Costing information.
Discussed in this article
You can select any of the below bulleted items to be taken to the corresponding section of this article where we discuss each of them:
Get Started on the One-Key Web App
- To get started, you’ll launch the One-Key app on web: https://onekey.milwaukeetool.com/app
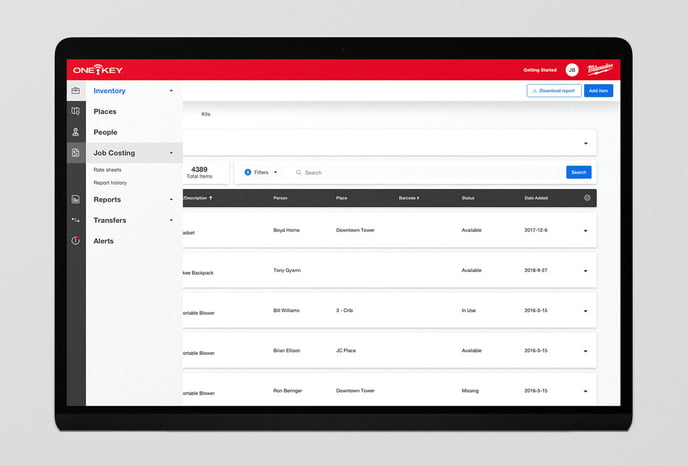
- Once you’ve logged into your One-Key account on the web app, your inventory will load by default. Along the lefthand side of your screen, you’ll see a new Job Costing icon among the menu options. From here, you have the option to access Rate sheets and Report history.
Job Costing: Adding Rate Sheets
Setting up rental rates in One-Key is pretty straightforward and you can apply these daily and/or weekly rental rates to individual tools or entire kits full of inventory you’re sending to the job.
When you send everything to the job, you can then calculate the cost accrued for each day your inventory is in the field.
Let’s show you how to set up a rate sheet:
- First, you’ll select Rate sheets from the Job Costing menu along the lefthand side of your screen.
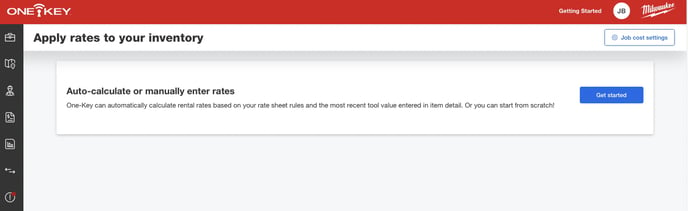
- Select the “Add rate sheet” button along the top righthand corner of your screen. Here, you’ll be shown a dialog box explaining that you have two options: To let One-Key auto-calculate your rental rates or create your own rental rates sheet from scratch.
- Select Get started.
Skip to:
How to Manually Add a Rate Sheet
When you select “Get started,” a popup with two options will appear.
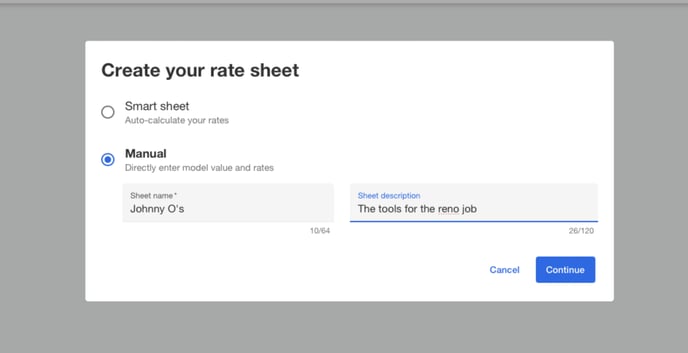 If you want to add your own rate sheets from scratch, you’ll select “Manual,” where you’ll be able to directly enter your tool’s (or tools’) value and associated rates.
- Name your rate sheet (this step is required). For example, you might name the rate sheet with a referring project it’s associated with, a client or team you’re lending inventory to, or any other shorthand or references that may be the most instructive to your tool team who may be referencing it. Further, you can add a sheet description for additional clarification.
- You’ll then elect a frequency for which you’d like this sheet to be applied: Daily or weekly rentals. Then select Continue to add your sheet.
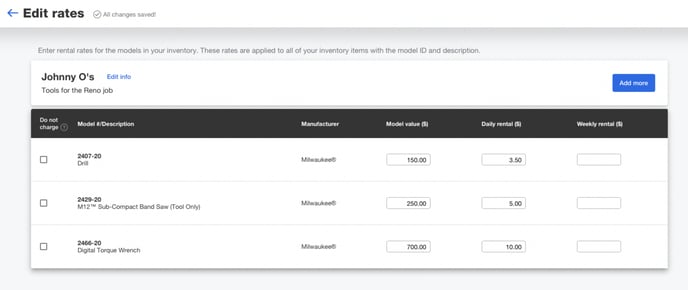
- On the next screen, your inventory will load, and you can manually set rental rates for each inventory item you’re renting out:
- You’ll start by setting the model value, then you can choose to set a daily or weekly rental rate (or both).
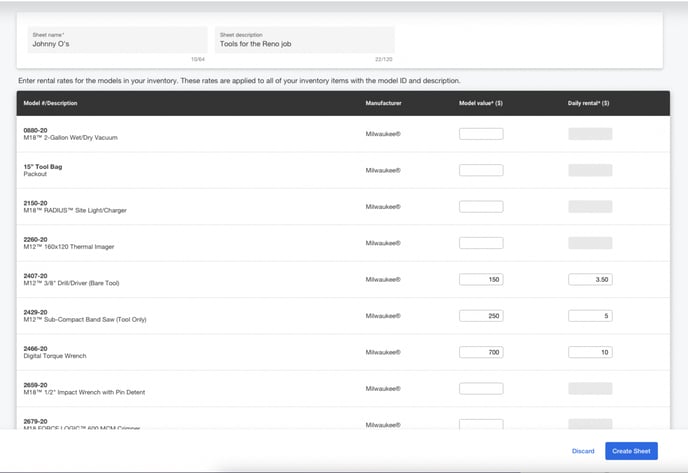
- You’ll repeat this for any inventory you’re applying to this rate sheet.
- Once you’re satisfied with this sheet, select Create Sheet.
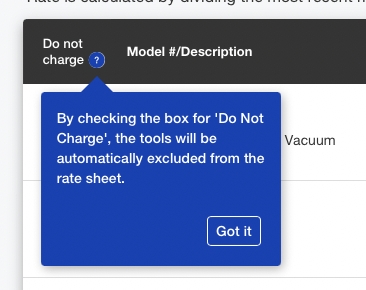
As an additional note: At the top of your inventory, you'll see a "Do not charge" option. You can mark the checkmark box by each item you’d like to exclude from this rate sheet. This feature is a common ask from our users, many of whom have a certain dollar threshold they do not need to invoke these rates for.
You now know how to set up a rate sheet manually. Back to Top
Now let’s show you how to add a smart sheet that auto-calculates your rates for you!
How to Add a Smart Sheet
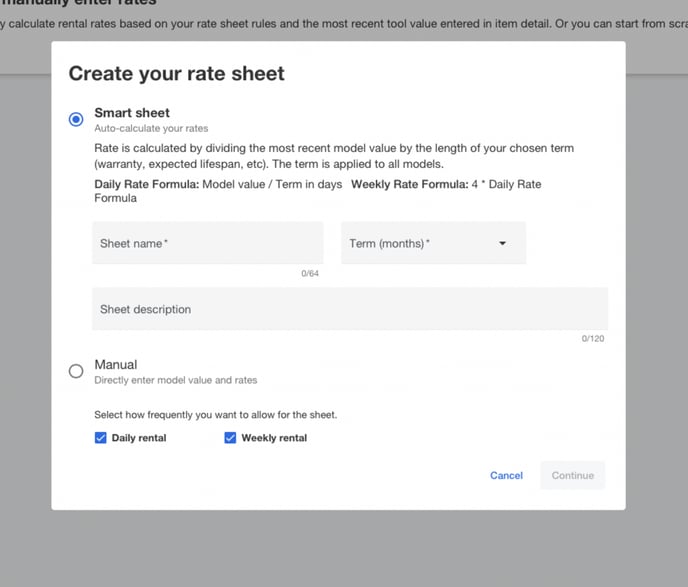
When you select “Get started,” a popup with two options will appear. If you want One-Key to automatically calculate your rates for you, you’ll select “Smart sheet.”
Rate is calculated by dividing the most recent model value by the length of your chosen term (warranty, expected lifespan, etc). The term is then applied to all models.
Rate formulas based on daily or weekly rates are as follows:
- Daily Rate Formula: Model value / Term in days
- Weekly Rate Formula: 4 * Daily Rate Formula
Let’s show you how to set up a smart sheet:
- Name your rate sheet (this step is required). For example, you might name the rate sheet with a referring project it’s associated with, a client or team you’re lending inventory to, or any other shorthand or references that may be the most instructive to your tool team who may be referencing it.
- Set a monthly term: 12, 24, or 36.
- Further, you can add a sheet description for additional clarification.
- You can set a daily or weekly rental rate (or both). Once you’re satisfied with your smart sheet, select Continue.
On the next screen, your inventory will load:
- For items you’ve already entered an item value for, One-Key will automatically fill this information in for you, and both a daily and weekly rental rate will be suggested for you.

- You can edit these rates if you’d like. You can also select the checkmark box by each item you’d like to automatically exclude from this rate sheet. This feature is is a common ask from our users, many of whom have a certain dollar threshold they do not need to invoke these rates for.
- For items you haven’t entered a value for previously, you can manually set the model value, then you choose to set a daily or weekly rental rate (or both).
- You’ll repeat this for any inventory you’re applying to this rate sheet.
- Once you’re satisfied with this sheet, select Create Sheet.
You now know how to add a smart sheet that will auto-calculate your rental rates for you.
But what if you need to make an edit to an existing rate sheet? Let’s show you how:
How to Edit Rate Sheets You’ve Previously Created
Follow these steps if you need to make any changes to a rate sheet you’ve previously created.
- You can navigate back to this sheet selecting Job Costing, then “Rate sheets.” Once here, you can tap into any of your recently created rate sheets to view or edit them.
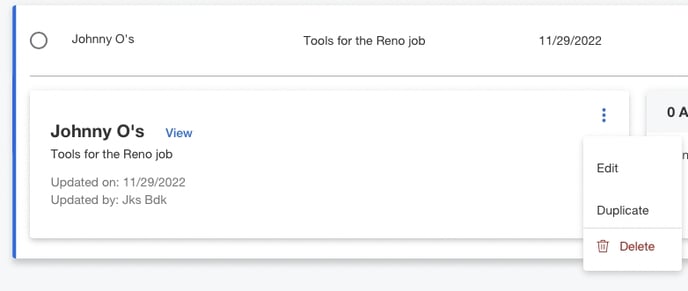
- To edit, tap the overflow icon beside the rate sheet name, then select Edit:
- If you want to leave an item that’s already been added to this sheet off, you can tap the blue checkmark, which will indicate to “Not charge” that item without having to delete it from the sheet entirely. Changes will automatically sync.
-
- If you want to add additional inventory to this sheet, you can do so by selecting Add more. This will open your inventory and you’ll follow the same steps as when creating this rate sheet to add each item by adding its value beside it, then setting a daily or weekly rental rate (or both). Once you’re satisfied, hit Save.
You now know how to add and edit job costing rate sheets you’ve set up manually or as smart sheets. Back to Top
Now, let’s show you how to apply these rental rates to a project/job.
How to Apply Rental Rates to a Project/Job
Now that you know how to set up a new rental rate sheet, the next, important step is applying these rates to your ongoing projects or jobs.
We’ll show you how to do that in this section of this article. Note: Rental rates can be applied to projects/jobs, but not vehicles or HQs.
There are two main ways to ways you can apply rental rate sheets to your projects:
How to Apply Rental Rates to New Projects/Jobs
- Along the lefthand navigation in your One-Key web app, select Places, then Add place.
- Select Project/Job: Rental rates can be applied to projects/jobs, but not vehicles or HQs.
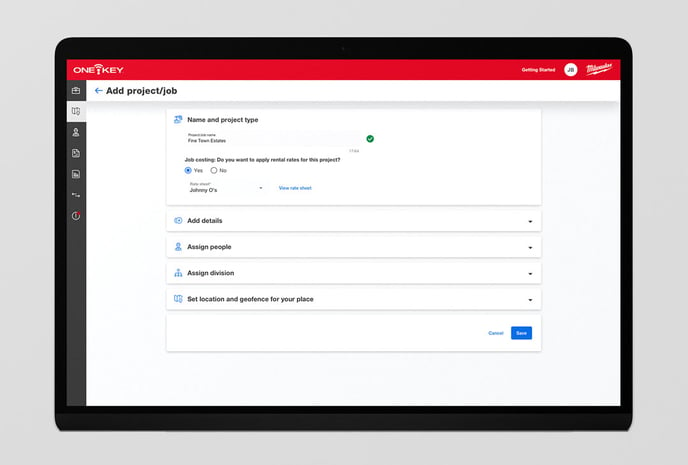
- On the Add project/job screen, you’ll see a job costing option and dialog: “Job costing: Do you want to apply rental rates for this project?” Select Yes.
- A dropdown menu will populate with all your recently added rate sheets. Select the rate sheet you want to apply to this project/job. You can also select “View rate sheet” if you’d like elect certain items as “Do not charge.”
- Fill out the rest of your place’s details as you normally would, then select Save.
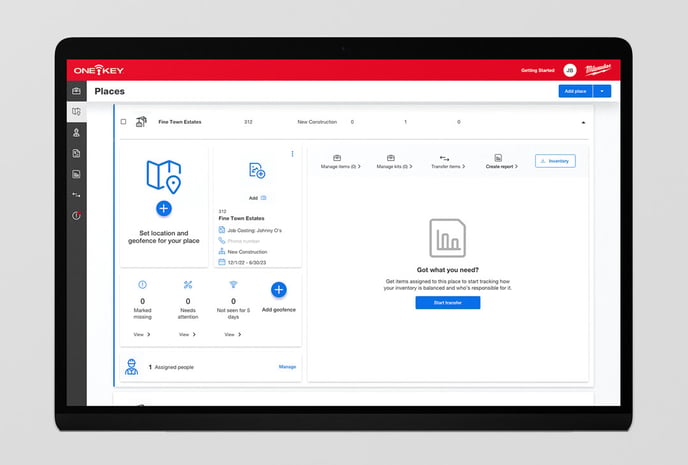
- Now, when you click into this place’s details card, you’ll see your rate sheet and its rental terms applied here.
How to Apply Rental Rates to Existing Projects/Jobs
- Along the lefthand navigation in your One-Key web app, select Places, then Add place.
- Find the project/job you want to apply your rate sheet to: Rental rates can be applied to projects/jobs, but not vehicles or HQs.
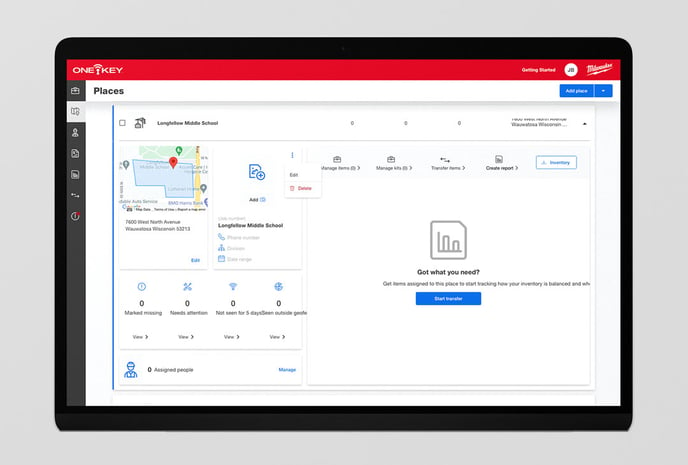
- When you’ve opened your place’s details card, click the overflow icon, which will open a dropdown. Select Edit.
- On the Edit project/job screen, you’ll see a job costing option and dialog: “Job costing: Do you want to apply rental rates for this project?” Select Yes.
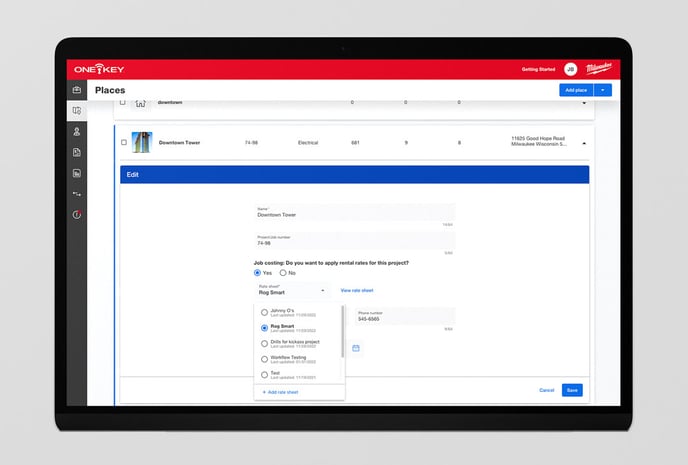
- A dropdown menu will populate with all your recently added rate sheets. Select the rate sheet you want to apply to this project/job. You can also select “View rate sheet” if you’d like elect certain items as “Do not charge.”
- Once you’ve made your selections, click Save.
- Now, when you click into this place’s details card, you’ll see your rate sheet and its rental terms applied here.
Now that your rental rates have been added, you’ll be able to see these terms applied to your inventory (both on mobile and on web) in a number of areas:
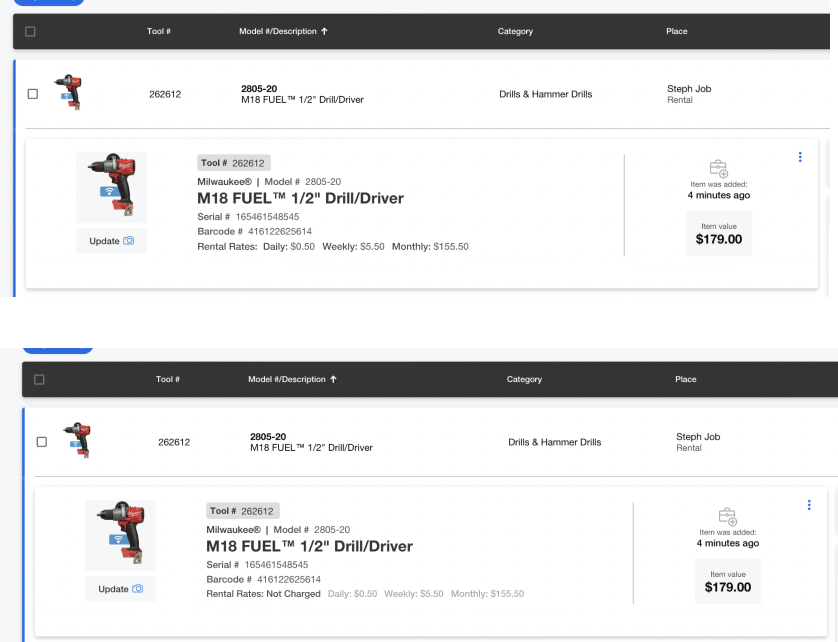
- You’ll see itemized rates by each item within a kit.
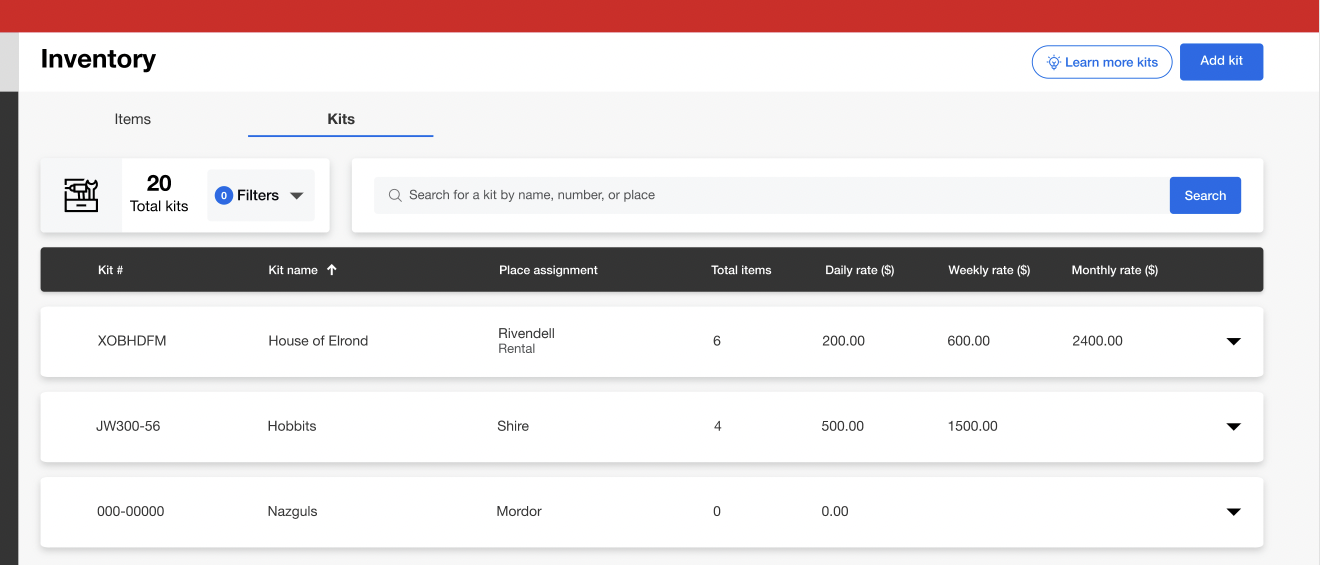
- For an item that is assigned to a kit or job where rental rates have been applied, you’ll be able to see this item’s itemized rate in its details card (as well as if “No charge” has been applied for this item.
Now, let’s show you how to create a job costing report for added stakeholder visibility and data-backed decisions.
Creating Job Costing Reports
- Along the righthand side of your screen, you’ll select the reports submenu, then Job Costing.
- The job costing report builder will load, and you can create a customizable report in 3 simple steps:
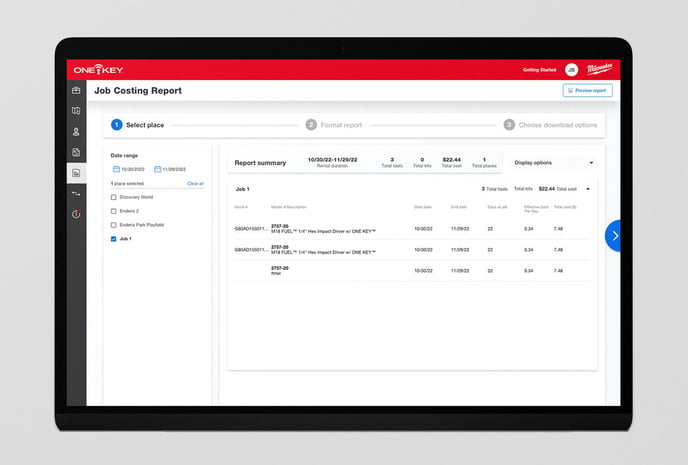
- Select a place: You’ll start by selecting the job (or jobs) you want to build a report from. Set a specific date range and select one or more places you’d like to add to this report. Additionally, the “Display options” dropdown can be selected to toggle on additional items you’d like to show in this report, such as your daily and/or weekly rental rates, effective cost per day, days onsite, and any other relevant inventory details (such as serial numbers, custom tool numbers, categories, division, manufacturers, etc). Keep in mind: You can select up to 8 display options.
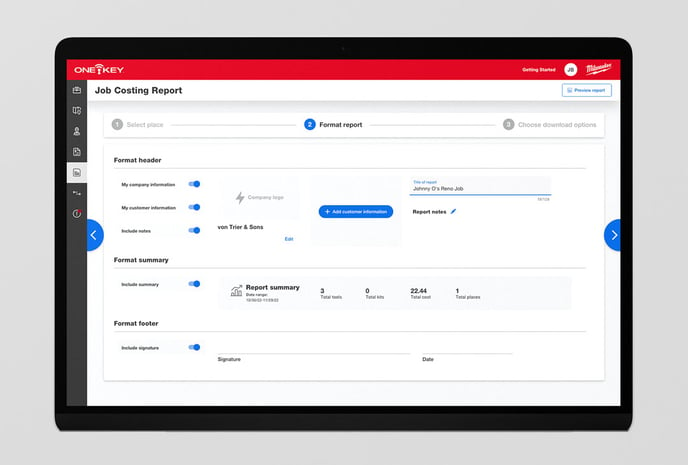
- Format report: Once you’re satisfied with your display options, you’ll select Format report. Here, you can:
-
- Format a relevant custom header including editing your report title, uploading company logos, adding your company information, customer information, and any liner notes to you might want to use to clarify to the recipient of this report what they’re looking at.
- You can select Include summary to affix a high-level overview of this report’s statistical details (e.g., total tools, kits, total costs, and total places involved).
- Toggle on Include signature to add a signoff line and date that can be used for stakeholder approval.
- You can also tap Preview report to make sure everything looks good and tweaking anything you’d like before moving on.
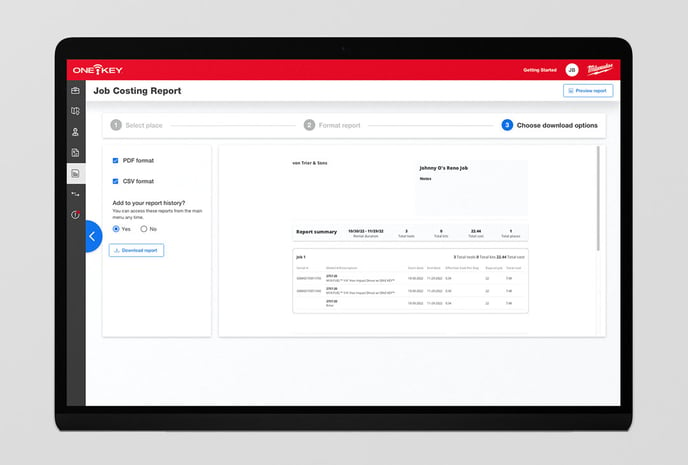
3. Choose download options: Finally, you can select Choose download options, where you’ll be able to select PDF, CSV (or both) file formats that can be downloaded to your computer (or attached to an email), and you’ll also have the option to add this report to your report history. Once you’ve made your selections, tap Download report to save this report to your computer.
Accessing Your Job Costing Report History
If you need to find a job costing report you’ve created and saved previously for later reference, you can find these easily by:
- Navigating, from Inventory, to the Job Costing submenu along the lefthand side of your screen, then selectin Report history.
You now know how to create job costing rate sheets from scratch or as a smart sheet, as well as how to edit them, and how to generate customizable job costing reports for stakeholders, as well as how to find these reports in One-Key for later reference.