Multi-user functionality introduces true membership in your One-Key account to all your employees, and lets you choose what each team member has access to.
With the custom roles feature of multi-user, you can take this functionality to the next level by modifying any 4 of the multi-user roles that are available to you to better fit the needs of your organization.
Get Started on One-Key Web App
- Launch the One-Key app on your web browser
- Navigate to your Admin panel on the One-Key site
Custom Roles
Making a 'custom role' starts with modifying one of the 4 following editable default roles:
- Items Only,
- Projects,
- Tool Manager,
- View Only.
- Select “Manage Roles”
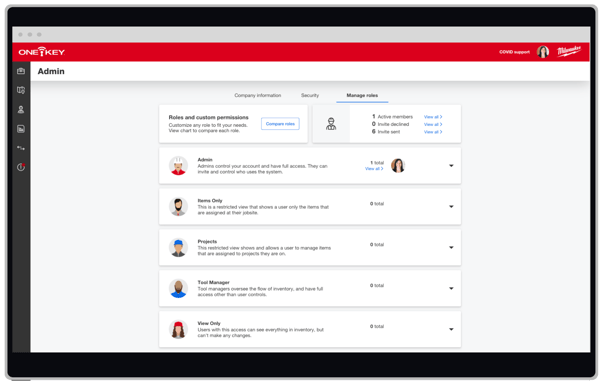
- To customize a role, click on a role you want to modify and it will expand. The role’s stock settings will display. Check marks indicate all the permissions associated with this role, while the grayed-out permissions indicate the items that this role does not come with by default.
- Click the overflow icon in the top righthand corner of this role to "Edit" the role's name/description.
- Click Save to make sure your new role is updated.
- To change the permissions associated with this role, click “edit permissions.”
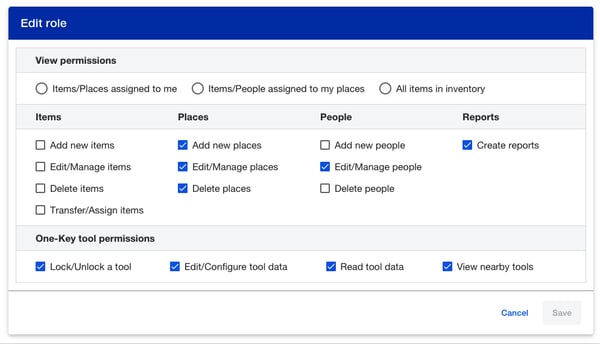
- Change the role’s view permissions.
- Change the role's "items," "places," "people," and "reports" permissions.
- Change the One-Key tool permissions
- Click Save once you’ve modified your role to your liking.
Now that you’ve customized your role, you’ll be able to invite new team members to join your account with a more tailored set of permissions that match your organization’s needs.