The ONE-KEY™ Bluetooth® Tracking Tag extends the industry leading Bluetooth tracking functionality of the One-Key app to untracked items—from expensive generators and power equipment to miscellaneous jobsite items like ladders, job boxes, carts, and more.
In this article, we’ll show you how to properly attach a One-Key Bluetooth Tracking Tag to one of your items through a variety of attachment options.
General Attachment Recommendations
First, determine the best area on the item to attach your Bluetooth Tracking Tag; this will be a flat area with minimal risk to abrasion or wear.
Keep in mind:
- Do not secure in such a way as to impede the safe use of the product; we recommend you avoid attaching on or near any of the following locations:
- Vents
- Moving parts
- Safety notifications
- Guards
- Hand holds
- Switches or controls
- Areas exposed to sparks or heat
Next, clean the surface of your item thoroughly. Use only mild soap and a damp cloth to clean, since certain cleaning agents and solvents may damage the QR code on your Bluetooth tracking tag.
Attachment Recommendations by Method
Our Bluetooth tag is low-profile and capable of being attached via numerous methods depending on user preference.
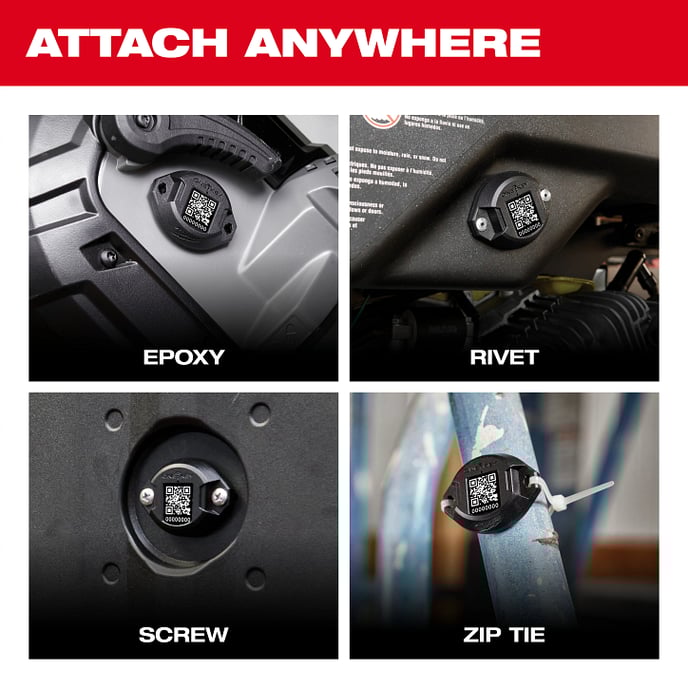
Below are guidelines for the most common attachment methods.
To Attach Your Tracking Tag Using Epoxy
- Lightly sand the mating surface on your item where you will be epoxying your Tag.
- For a stronger bond, lightly sand the backing surface of your Tracking Tag.
- Wipe both surfaces clean.
- Mix epoxy.
- Spread a small amount on the backside of the tag, then plank the tracker on the mating surface of your item and clamp them together.
- Allow the epoxy to cure; consult manufacturer’s instructions for curing time period.
To Attach Your Tracking Tag Using Screws
- Ensure the space behind the intended placement of your Tag is clear.
- Mark holes in your desired mounting location.
- Drill pilot holes with a distance of 1-1/2” between each hole.
- Place your Tag over the pilot holes. Using #8 pan head self-tapping screws, fasten your screws to the top of the Tag slots and into your predrilled pilot holes.
To Attach Your Tracking Tag Using Zip Ties
- Mark holes in your desired mounting location.
- Loop a single zip tie through both mounting holes and feed the zip tie flat around the backside of your Tag.
- Fasten the zip tie.
- Cut off excess with wire cutters—ensure no excess poses a safety risk.
You have securely attached your Bluetooth Tracking Tag and your item is now ready to be tracked by the industry’s largest community Bluetooth tracking network.