Assigning tools to a place—whether it’s your home base, a remote job site, or a moving vehicle—is key to tracking where the different items in your inventory are located from one project to the next. But before you can assign a tool to a specific spot, you need to know how to set up that spot in One-Key. In this article, we'll show you how to add a place via the One-Key mobile and web-based apps.
You can select any of the below bulleted items to be taken to the corresponding section of this article where we discuss each of them:
Get Started on the One-Key Mobile or Web App
- Launch the One-Key app on your mobile device or in your web browser.
- Your inventory will load by default.
How to add a place on Android
Note: The screens featured in this article may appear different than what you see on your device due to different phone manufacturers having different procedures.
- Tap ‘Places’ along the bottom navigation menu, then tap the white "+" icon to get to the Places selection screen.
- Here, you'll be given option to add 3 main kinds of places in One-Key:
- A Project or Job might be one of your active jobsites;
- A Home Base would be your headquarters or a central tool and equipment storage location, such as the crib or tool room;
- A Vehicle is any job on the move, like a service truck or van.
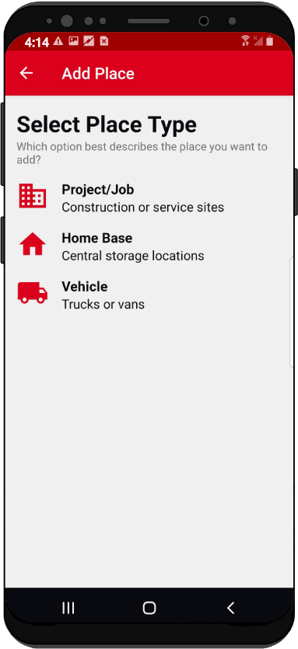
- Once you've made a selection, tap on the place type you want to add.
- On the next screen, you'll be able to add your new place.
Note: This screen will look slightly different depending on the type of place you're adding. For project/job, you'll see an option to add a project/job number, while home base has the option to add a cost code, and vehicle has the option to add a vehicle number. All that's required to save this place is a name, or you can tap the "ADD DETAILS" button to add more project information.
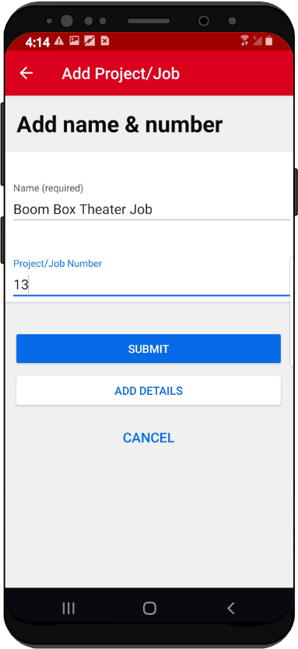
- If you're ready to add this place, tap "Submit." You’ll get a green success banner telling you that your place was successfully added. Tap “view place” to see your new place.
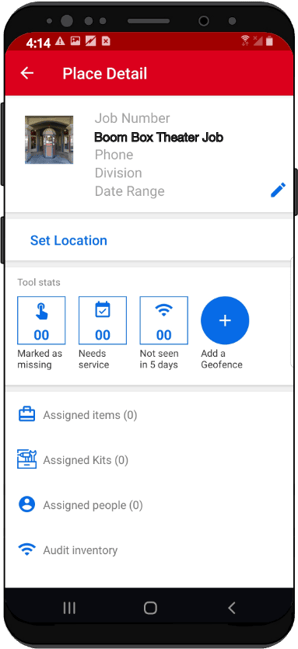
- This is your new place’s details. Tap ‘Set Location’ to add an address for your new place. You can type your place’s address directly into the provided search bar at the top of your screen or press and hold the map to drop a pin on your desired location. Tap the save button in the top righthand corner of your screen to log this location into the app.
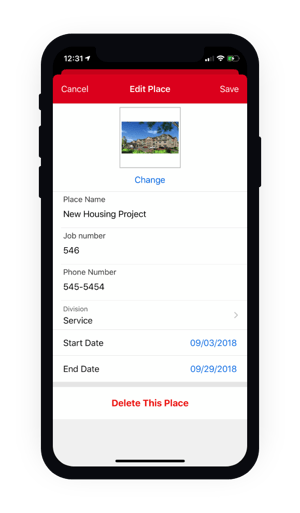
- Click the back button to get back to your place’s details. Once here, you can tap the blue pencil icon to edit this place and add more information.
- You can add the phone number for this place so team members can reach you. If you wish, you can also select a division to better describe the type of work done here, and you can add a photo to your place so it’s visually recognizable in the app. You can also assign crew members to manage this place.
- Make sure to save everything you've added.
Your place has been added to One-Key.
How to add and customize a place on iOS
With the Add a Place feature in One-Key, you can organize tools and equipment at a specific project, so you'll be able to take inventory right from your smartphone or tablet.
A Place can be:
- Your home base or a central tool location where your tools will be stored
- An ongoing project or job site
- Or even a vehicle moving between job sites, where your tools are temporarily stored.
To Add a Place:
- Start at the Inventory Dashboard and tap Places at the bottom of the screen.
- Now tap the “+” sign in the upper right-hand corner of the screen.
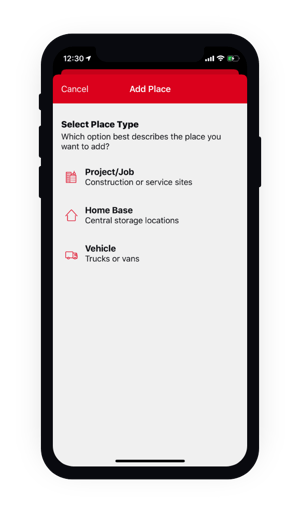
- The next page will display three options for the type of place you’d like to add: Home base, Project/Job, and Vehicle. Tap on the type of place you’d like to add.
- From here, you can enter the Place Name (required) and Cost code. Now choose to either Submit your new place or Add Details:
- Phone number: The contact information associated with your new place.
- Division: The team or work crew associated with your new place.
- People: The name of individual team members associated with your new place.
- Image: A photograph of your new place.
5. Once all your relevant details are added, tap Set Location at the bottom of the screen. A map will enlarge to fill your screen.
6. From here, either enter the address of your new place into the search bar at the bottom of the screen or tap and hold a spot on the map to drop a pin.
7, Now you can tap the blue “Add Geofence” button if you want to set up a virtual perimeter around your new place. A rectangular box will appear over your place. Tap and drag the perimeter buttons to adjust the shape and size of your geofence.
8. When everything is entered to your satisfaction, make sure you tap the “Submit” button in the upper right-hand corner of the screen.

Now your new place will appear on your Place's Dashboard.
How to add and customize a place on web
The Add a Place feature is a great way to organize your tools in One-Key. A place can be anything from a vehicle moving between job sites where your tools are temporarily stored to the home base where they eventually return. Once a place is added, you can edit it to include details like address, assigned personnel, and geofencing, an innovative feature that you can read about in our Add a Geofence article. Keep in mind: You'll only be able to add geofences to stationary places, not mobile vehicles like service trucks.
To Add a Place:
-
Start at the Inventory Dashboard and hover your cursor over the map icon on the left side of the screen. The navigation bar will expand, revealing a list of options. Click “Places.”
- In the upper right-hand corner of the Places Dashboard, click the blue “Add place” button.
-
The next page will display three options for the type of place you’d like to add: Home base, Project/Job, and Vehicle. Click on the blue “Add” button beneath the type of place you’d like to add.
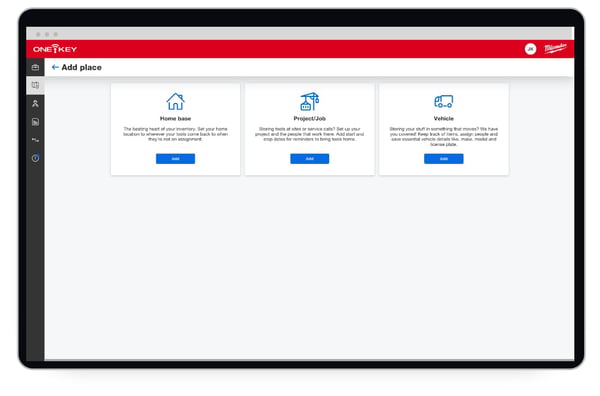
You'd typically choose home base to set up your company's headquarters or a central tool location, like a crib or tool room, and Project/job for all your ongoing projects. Choose Vehicle for all your jobs on the move.
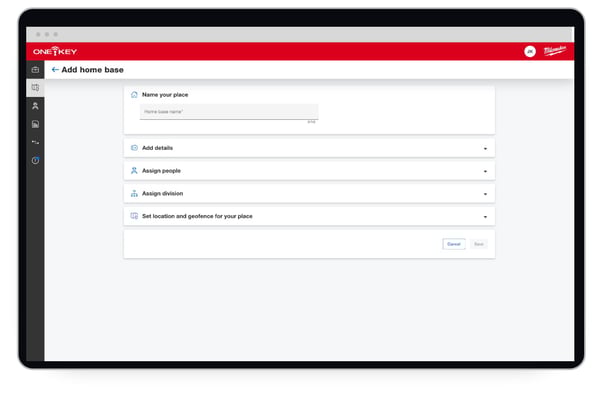
4. The next screen will display a customization page. Here you will find a series of dropdown fields that you can edit to customize your place, including its name, address, and other details like geofencing, which you can read about in our Add a Geofence article.
-
Make sure that you “Name your place” (you won’t be able to save your entry if your place does not have a name).
-
Add the important details like your home base number and main phone number. Add a photo to display on your list of places.
-
Assign your crew members that are associated with this location.
-
Assign this place's division–electrical, mechanical, etc.–to make this place's purpose clear.
5. Edit the details of your place, and be sure to click “Save” at the bottom of the page.
Now that your new place is set up, it will display on the Places' Dashboard.
Now that you've added a place, you can better track your inventory at this location and maintain a sense of accountability and transparency on the job and across your operations. Important information about your most used locations and the tools stored there, as well as the personnel assigned to them, can be found right from your place's dashboard.